MCP for DFIR


Hello Everyone,
I have been seeing many posts regarding MCP servers on X (Twitter) lately, featuring numerous toolkits for coding, documentation, and more. This got me thinking about applying it to DFIR use cases, like Digital Forensics and Malware Analysis.
While there are already many MCP servers available for DFIR, I wanted to build some on my own to better understand the architecture, as well as explore some readily available servers from reputable sources. So In this post, I will cover setting up a local LLM and building some simple MCP servers specifically for DFIR.
A Brief Intro on LLM and MCP
An LLM, or Large Language Model, is a type of AI model trained on vast amounts of data to understand, generate, and process human-like language. There are a few key terms to know when dealing with LLM models:
The Model Context Protocol (MCP) is an open standard that allows an AI model to connect with and use external tools, data sources, and APIs. The protocol is designed to provide the AI with context and the ability to act on that information. With the help of MCP, it is possible to perform many tasks using natural language, making analysis and research much easier.
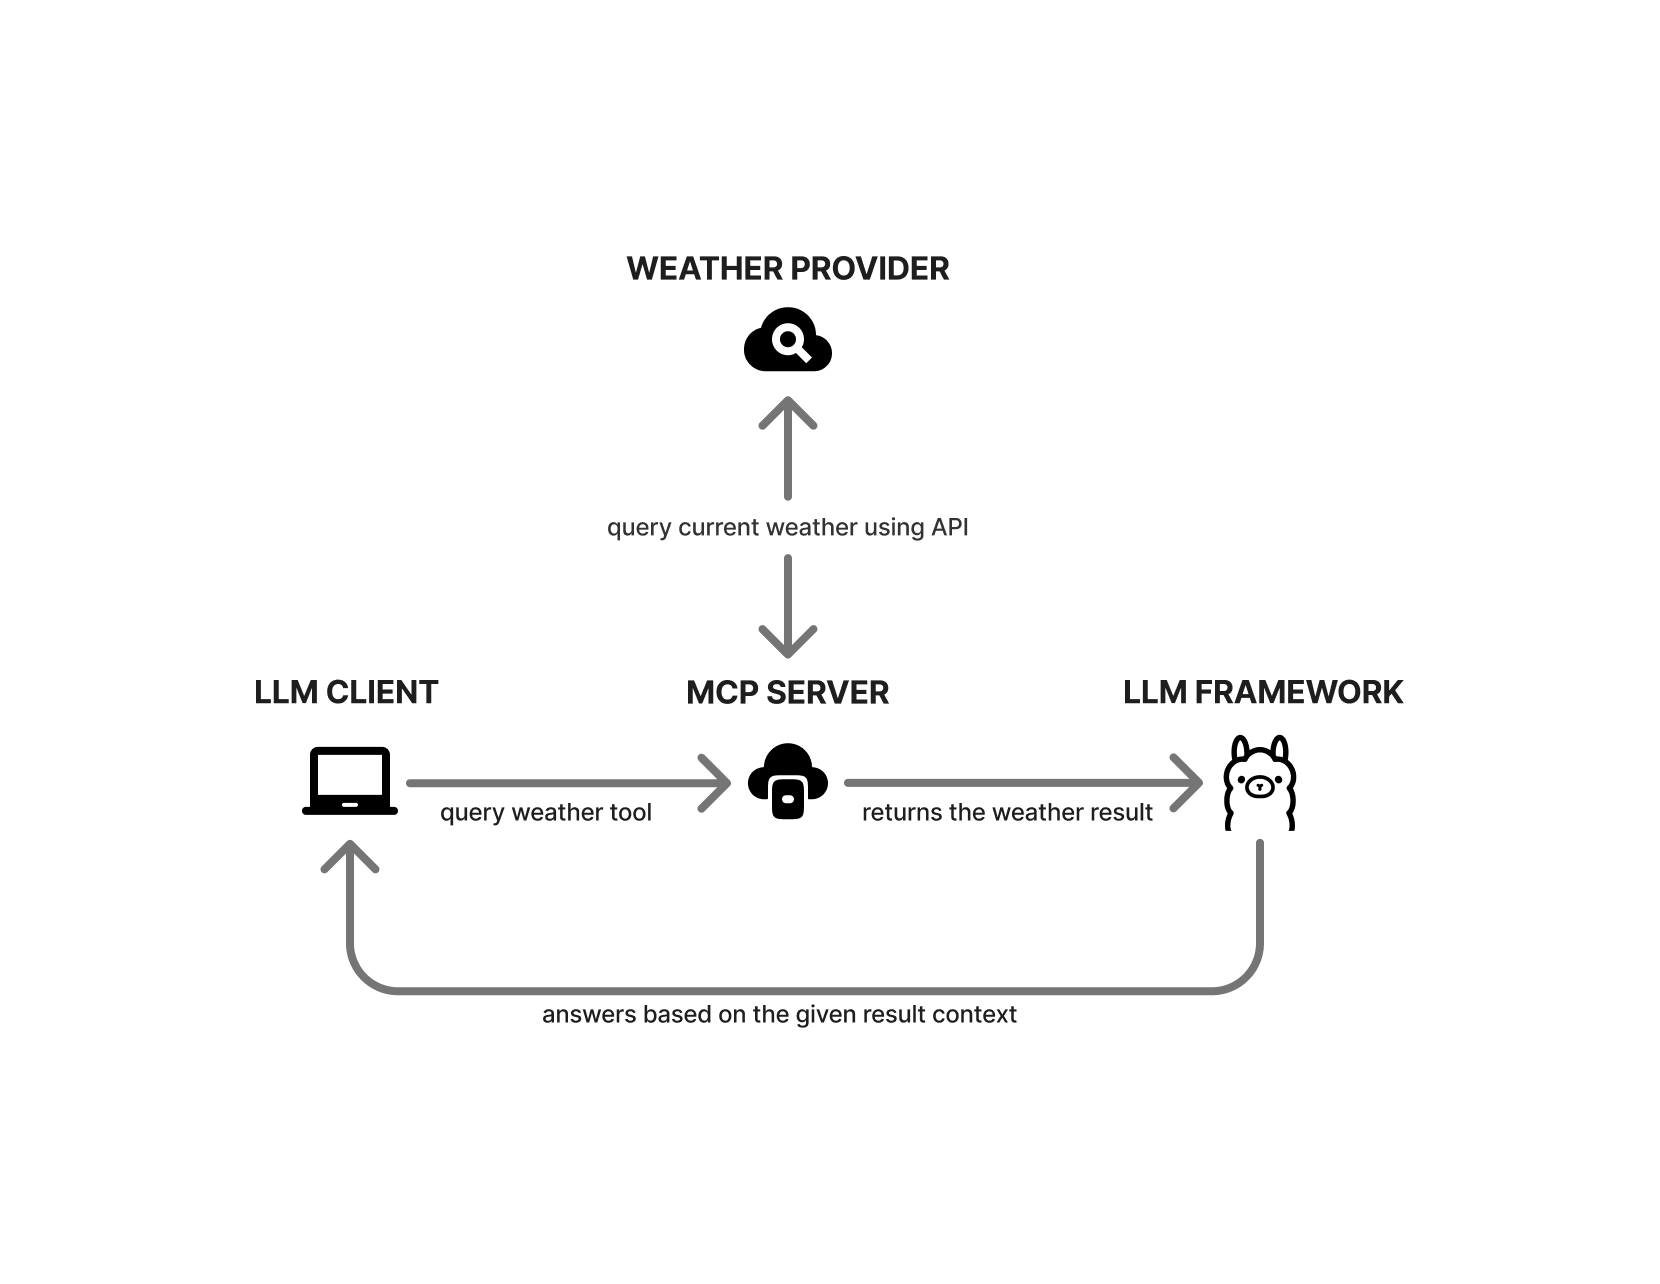
Here is a generic example: we ask the model to get the current weather for a city. Our LLM client first checks if any MCP servers are set up. If they are, it asks the MCP server for available tools and sends the city name as a parameter to the compatible tool. The tool then calls a weather provider’s API to get the current data. It returns the result in a format the AI model can understand, and the model then responds based on that data.
Why Local LLM
Why use a local LLM when popular chatbots like ChatGPT, Claude, and Gemini exist?
In most real-world cases, there is a significant amount of confidential data to be analyzed that cannot be casually uploaded to cloud-based chatbots. To keep data secure, it is best to utilize locally hosted LLMs.
An ideal architecture would involve serving LLMs and MCP tools on a virtual machine or inside a Docker container with security controls in-place. This ensures isolation from the host and prevents accidental data exposure, keeping the entire analysis stack in a sandboxed environment.
Local LLM Setup
To run a local LLM, there are two popular options: Ollama and LM Studio. Both are user-friendly. LM Studio offers a graphical user interface (GUI), which makes it simple to adjust model settings and parameters, while Ollama is lightweight and well-suited for running in headless mode. It also provides a GUI. However, it is not as advanced as LM Studio. Currently, LM Studio performs best on macOS because it leverages Apple’s native MLX libraries. On Windows and Linux, both LM Studio and Ollama offer comparable performance. For this blog, I will primarily be using LM Studio.
The LLM models discussed in this blog can run on most GPUs with 4 GB or more of VRAM. If your GPU has less memory, you can still run smaller models with fewer parameters (such as 1.7B or 0.6B). However, output accuracy depends heavily on the model's parameters. Generally, the higher the parameter count, the higher the accuracy.
For practical LLM usage, you will definitely need more than 16 GB of VRAM to achieve useful results. Because MCP tool calls and other data can easily consume significant context length, you should aim for a context window of over 100k tokens to effectively perform Agentic investigations.
Installing LLM Model
LM Studio
Installing models in LM Studio is straightforward: just click the Models Search button to open the search dialog and install any model you like. For this blog, I am using the Qwen3 4B 2507 model, which performed well compared to other models with similar parameter weights.
Ollama
The default Qwen 3 4B 2507 Instruct model doesn't support the GGUF format required by Ollama, so I used the Qwen3-4B-Instruct-2507-GGUF model by unsloth.ai from Hugging Face. We can download the model using the following command:
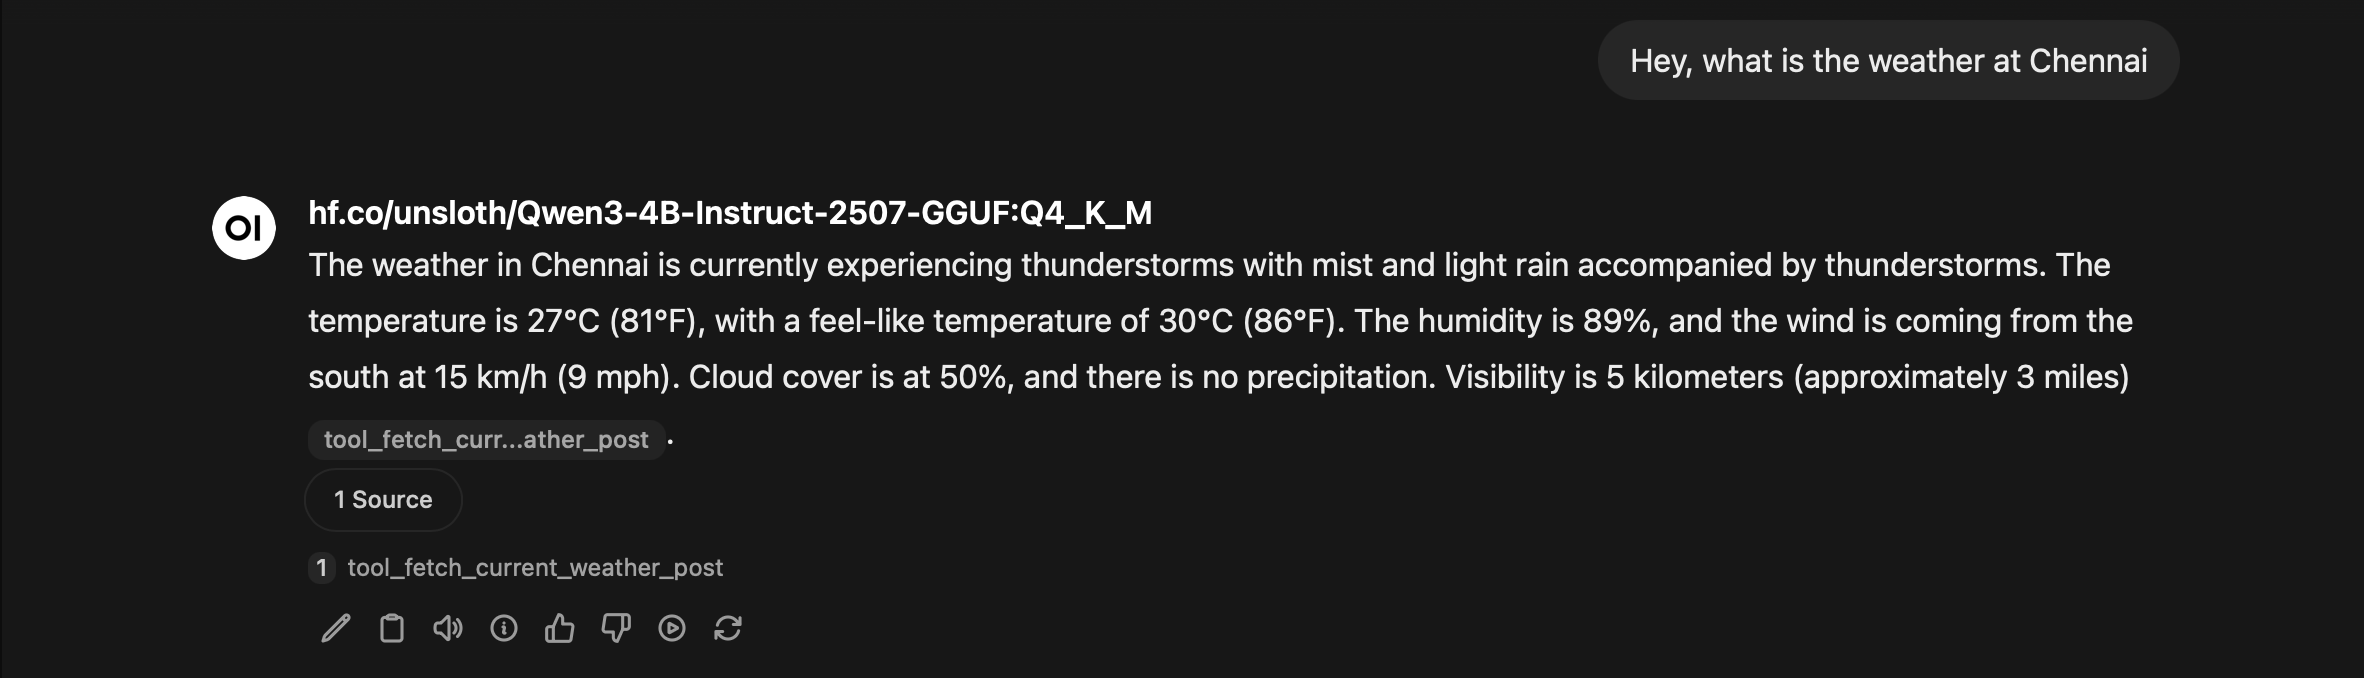
ollama pull hf.co/unsloth/Qwen3-4B-Instruct-2507-GGUFThe hf.co/unsloth/Qwen3-4B-Instruct-2507-GGUF model uses 4.1 GB of VRAM while running with an 8192 context length. You can adjust the context length depending on your specific needs by referring ollama docs.

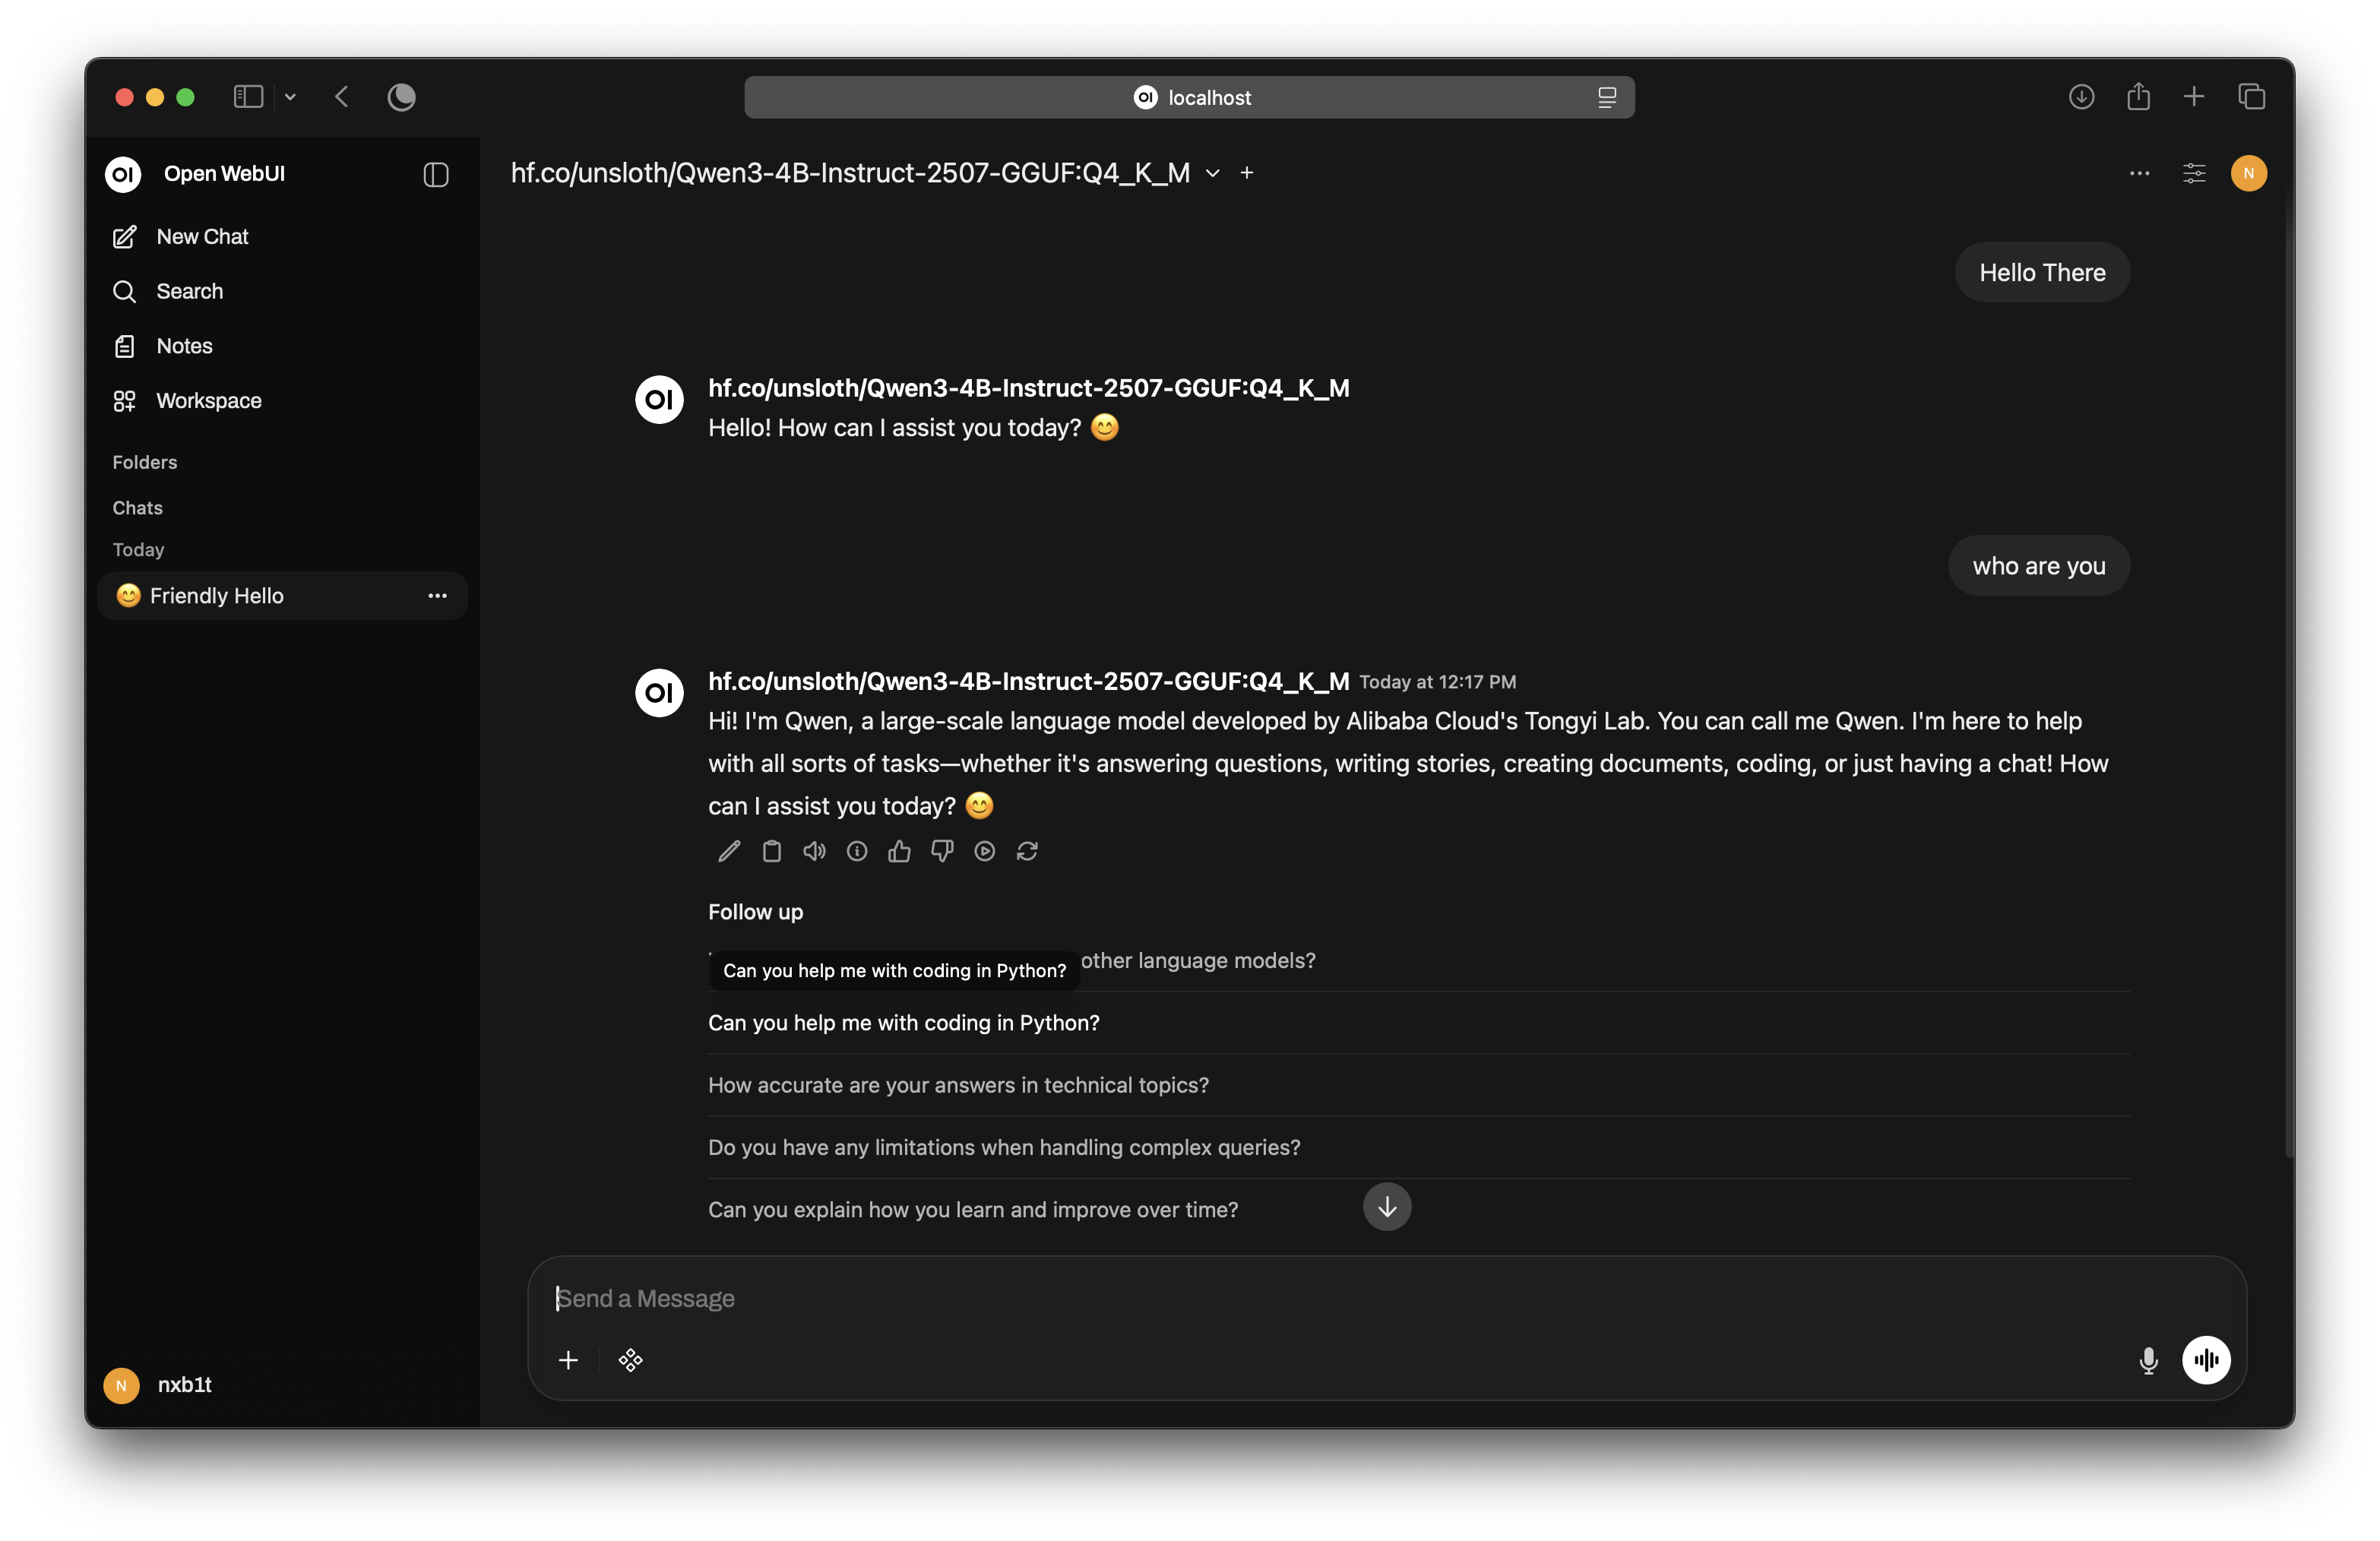
OpenWebUI
Many open-source chat interfaces, such as AnythingLLM and LibreChat, are available for Ollama. However, I chose OpenWebUI because it offers a clean, ChatGPT-like interface and an easy installation process.
# This will start openwebui on port 8080
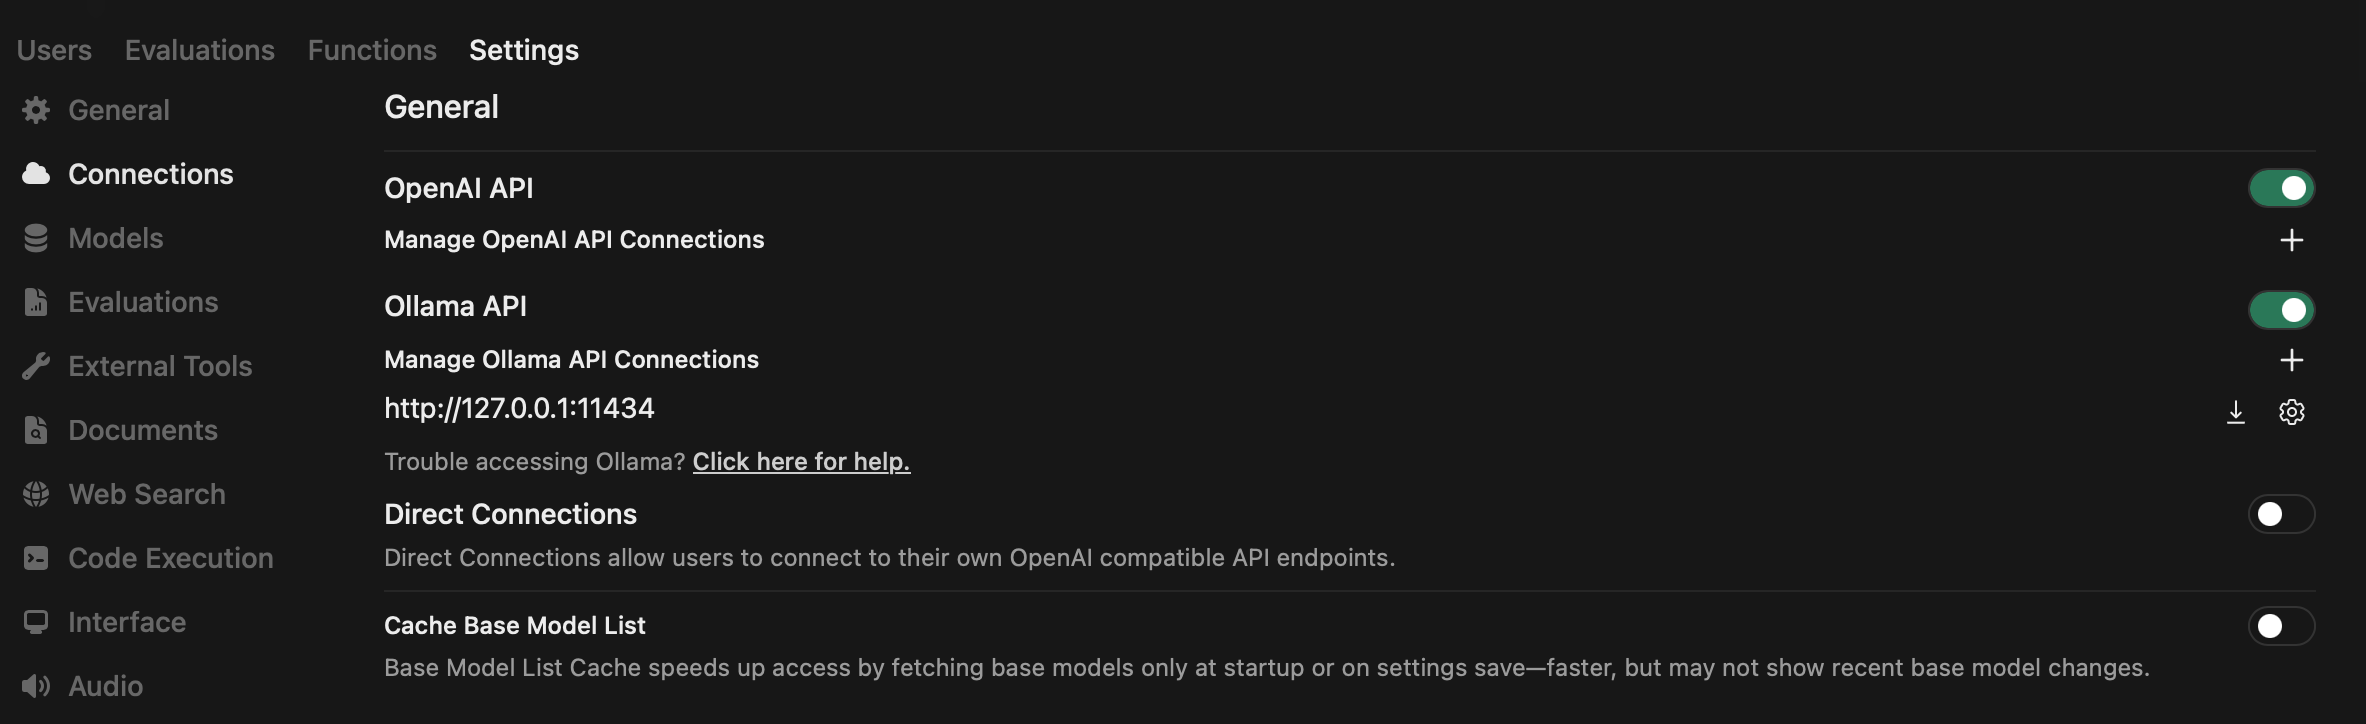
docker run -d --network=host -v open-webui:/app/backend/data --name open-webui --restart always ghcr.io/open-webui/open-webui:slimIn the Ollama API section inside Admin Panel --> Settings, specify the http://127.0.0.1:11434 endpoint. If your Ollama instance is on a separate server, use that IP instead of localhost. You can also specify other OpenAI API-compatible servers, such as the LM Studio server.
That's it! We have a working, ChatGPT-like local LLM ready.
ollmcp
If you want MCP tool support without a resource-intensive GUI, ollmcp is an excellent choice. It is a Terminal User Interface (TUI) app with built-in MCP support.
pip3 install ollmcp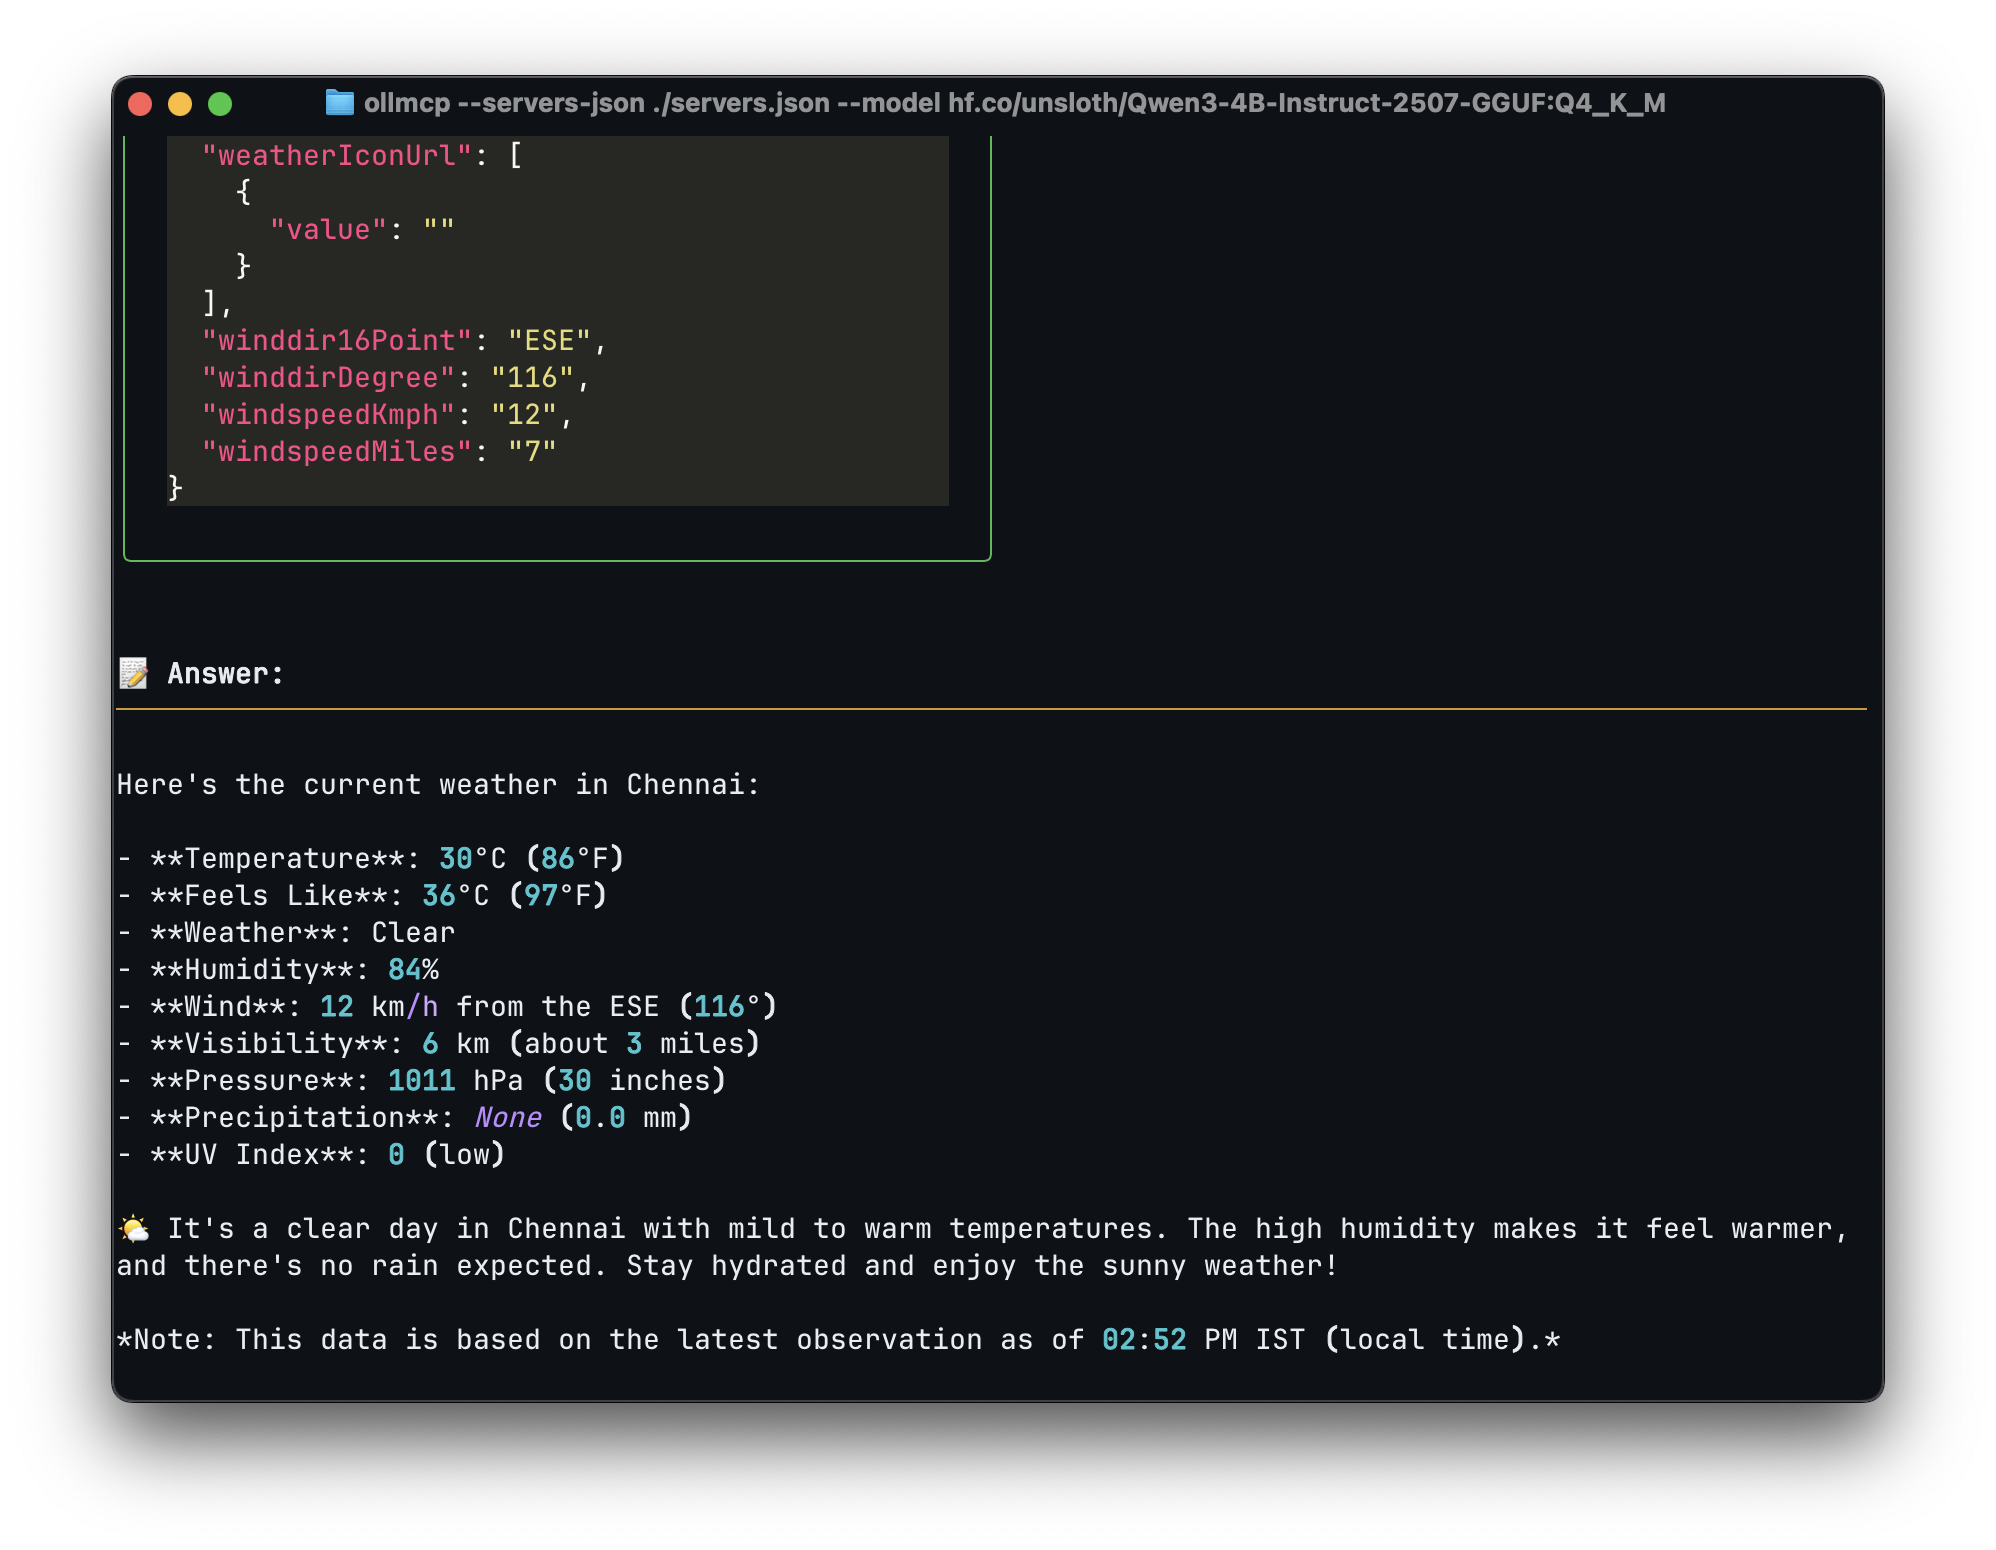
MCP Server Structure
Now, let's look at the MCP servers that we can integrate with our local LLM setup. MCP servers can be created in various languages, including C, JavaScript, and Python. For simplicity, I will use Python and the fastmcp library.
pip3 install fastmcpBelow is a simple MCP server that returns "Hello World." We begin by importing the FastMCP library. Next, we initialize FastMCP to name our server. We use the @mcp.tool() decorator to make the function MCP-compliant. The rest of the code is structured similarly to a typical Flask API endpoint. We also include a docstring within the function to describe the tool's purpose, which serves as metadata for the LLM.
from mcp.server.fastmcp import FastMCP

mcp = FastMCP("HelloMCP")

@mcp.tool()
def say_hello(ip: str) -> str:
    """
    Say Hello World
    Returns:
        responds hello world text
    """
    return "Hello World"


if __name__ == "__main__":
    mcp.run(transport='stdio')
There are two primary transport methods for MCP servers:
Configuring MCP Server
Here is how to configure an MCP server for different open-source LLM clients.
OpenWebUI
OpenWebUI requires OpenAPI-standard MCP servers, it does not support stdio or standard streamable HTTP servers directly. We can use the mcpo Python package to convert any stdio MCP server to the OpenAPI standard.
pip3 install mcpo
mcpo -- python3 your-mcp-server.py # This will run openapi standard MCP server on http://0.0.0.0:8000/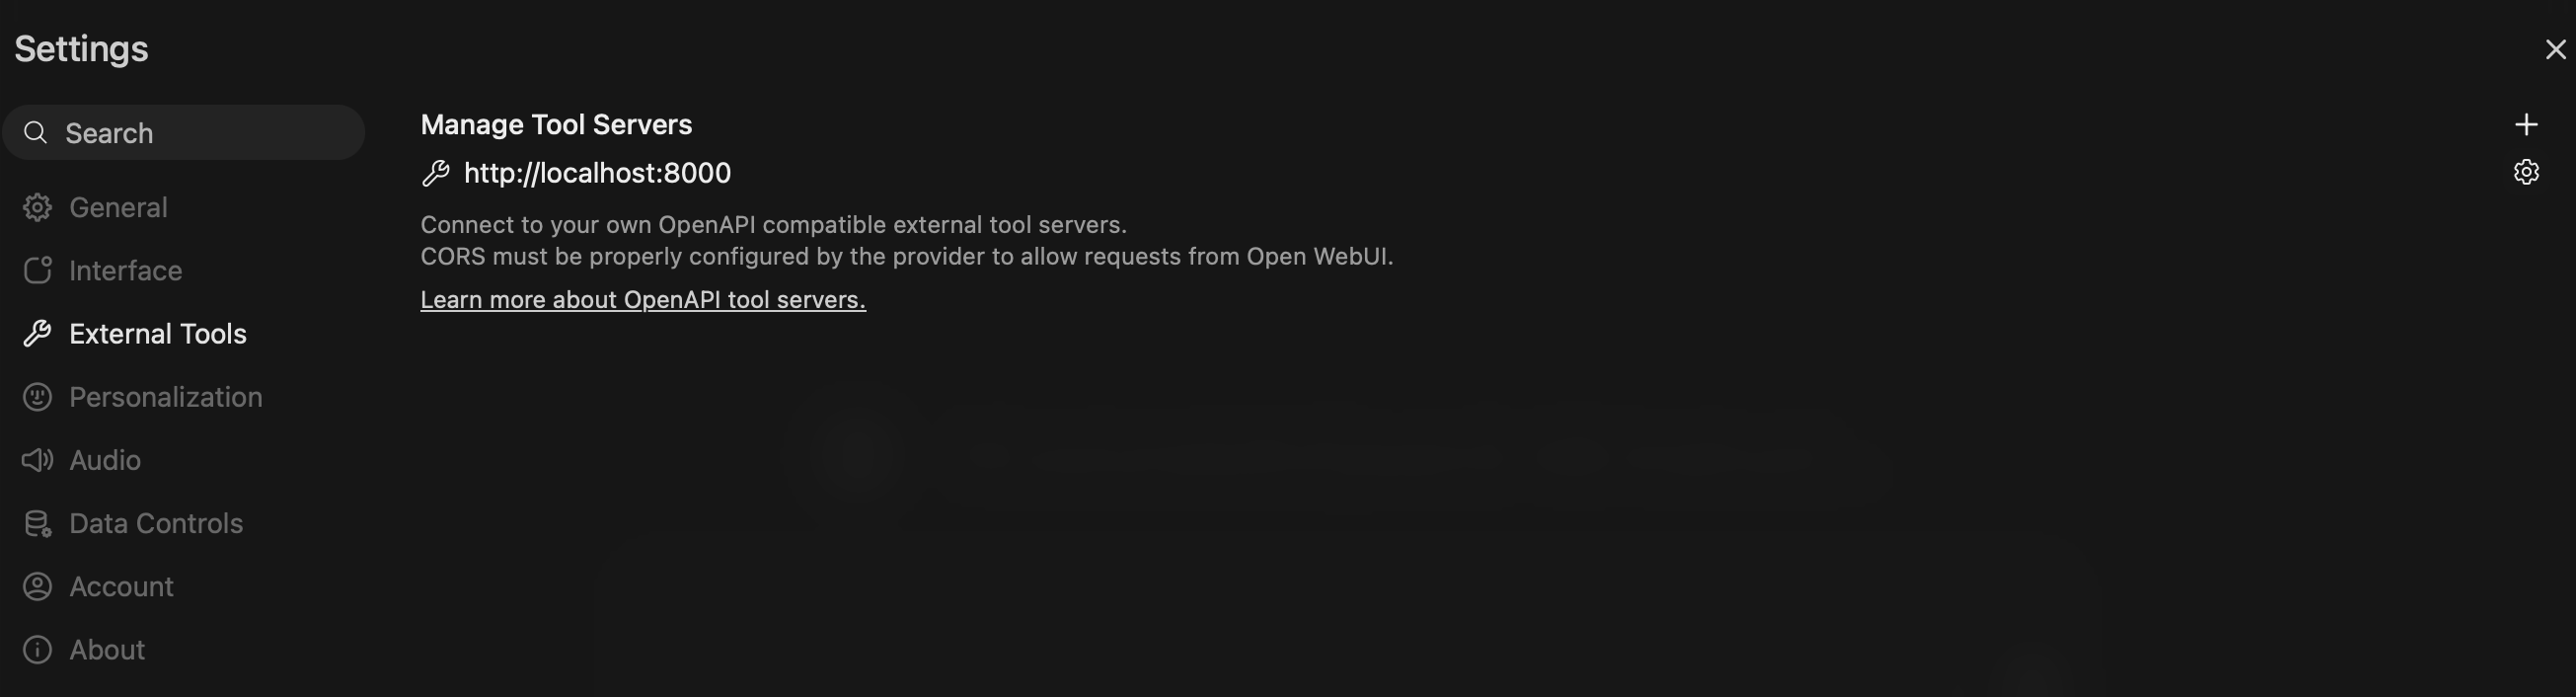
LM Studio and ollmcp
For both ollmcp and LM Studio, MCP configuration files are stored in JSON format. LM Studio configurations are located at $HOME/.lmstudio/mcp.json, while for ollmcp, you can pass the configuration file path as an argument.
ollmcp --servers-json ./servers.json --model hf.co/unsloth/Qwen3-4B-Instruct-2507-GGUF:Q4_K_MExample MCP configuration file for both ollmcp and LM Studio:
{
  "mcpServers": {
    "weather": {
      "command": "python3",
      "args": ["/path/to/weather.py"],
      "enabled": true,
    }
  }
}
{
"mcpServers": {
"weather": {
"url": "http://localhost:8000/mcp",
"enabled": true,
}
}
}Practical Use Cases
Let’s look at some practical applications of MCP servers in threat intelligence, threat hunting, digital forensics, and malware analysis.
Threat Intelligence
During investigations, we may find multiple IOCs, which could be IPs, domains, URLs, or file hashes. Most of the time, this involves manual searching on threat intel platforms. However, by building an MCP server around these platforms, we can get better contextual data and even capture the minute details that may be missed during manual searching. Here, I have created a simple MCP server to check IP reputation using AbuseIPDB. This is just a foundational example.
from mcp.server.fastmcp import FastMCP
import json
import requests
import os

ABUSEIPDB_API = os.environ.get("ABUSEAPI_KEY")

mcp = FastMCP("ThreatMCP")

@mcp.tool()
def check_ip_abuseipdb(ip: str) -> str:
    """
    Get IP reputation from AbuseIPDB service
    Args:
        ip (str): IP Address
    Returns:
        Json result showing the reputation of IP, high confidence score and report means highly malicious
    """

    try:
        url = "https://api.abuseipdb.com/api/v2/check"
        query = {
            "ipAddress" : ip,
            "maxAgeInDays" : "90"
        }

        headers = {
            "Accept" : "application/json",
            "Key" : ABUSEIPDB_API
        }

        response = requests.request(method='GET', url=url, headers=headers, params=query)
        res = json.loads(response.text)
        return json.dumps(res)
    except Exception as e:
        return str(e)

if __name__ == "__main__":
    mcp.run(transport='stdio')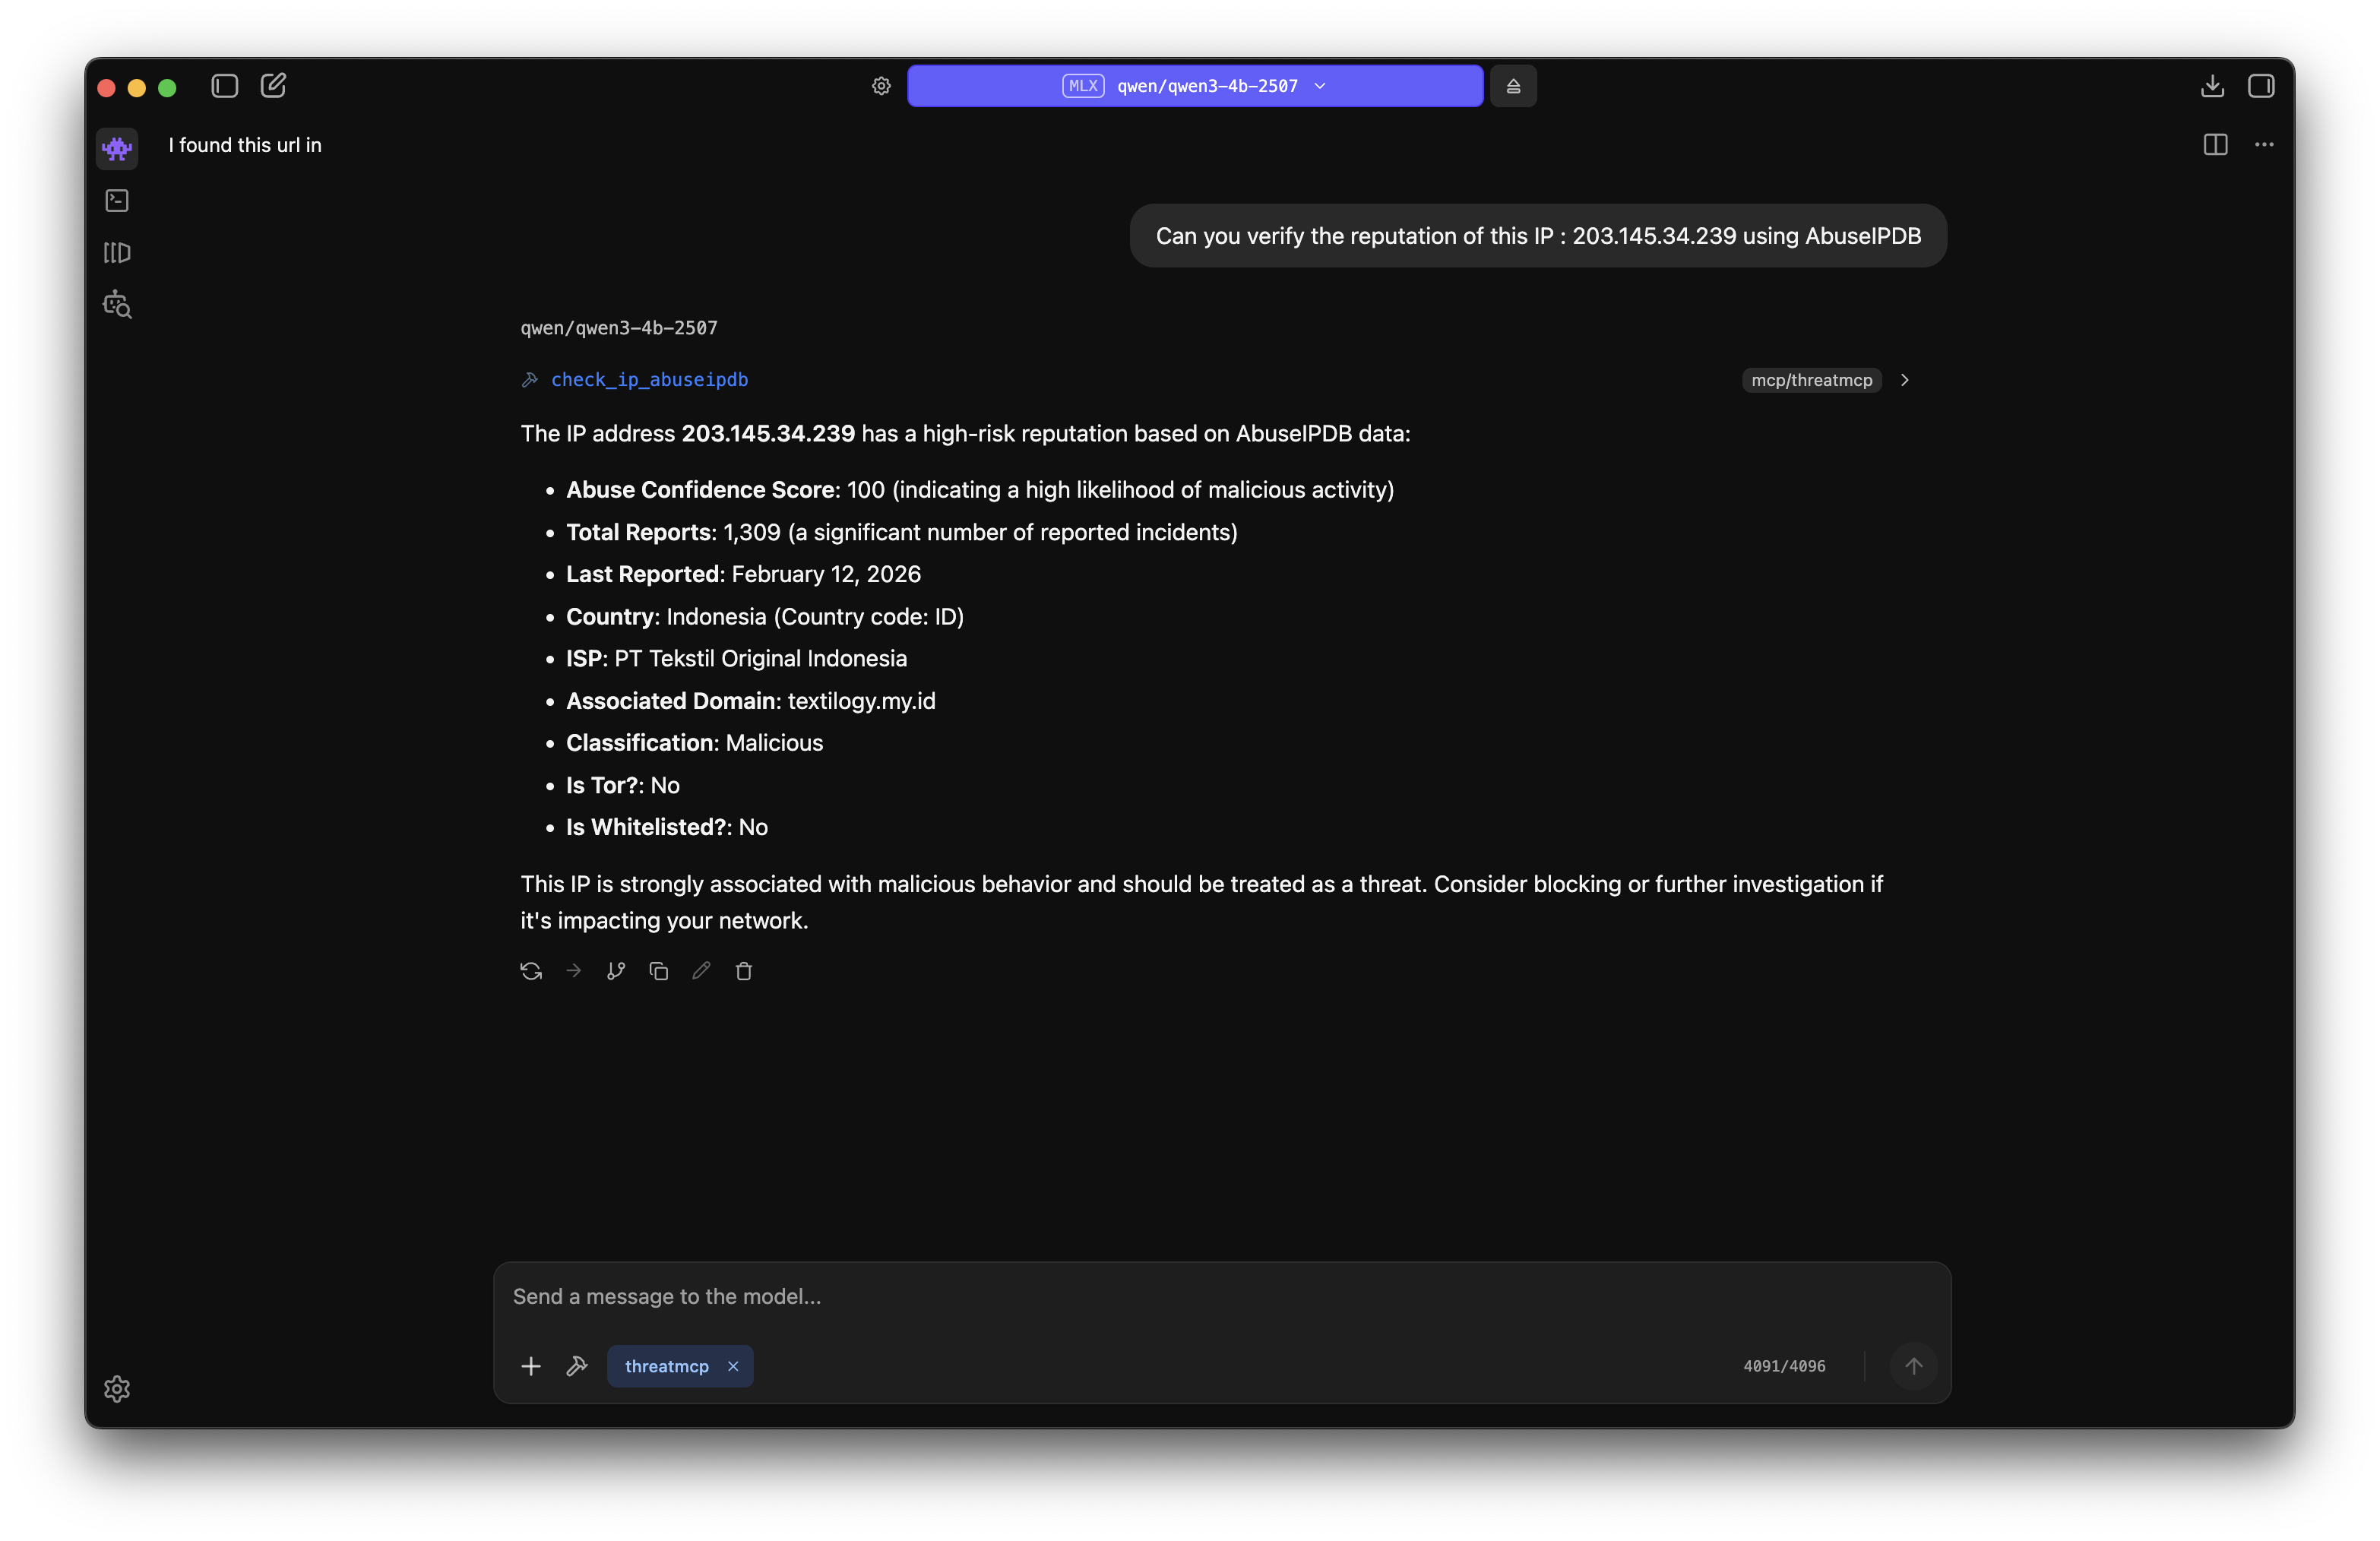
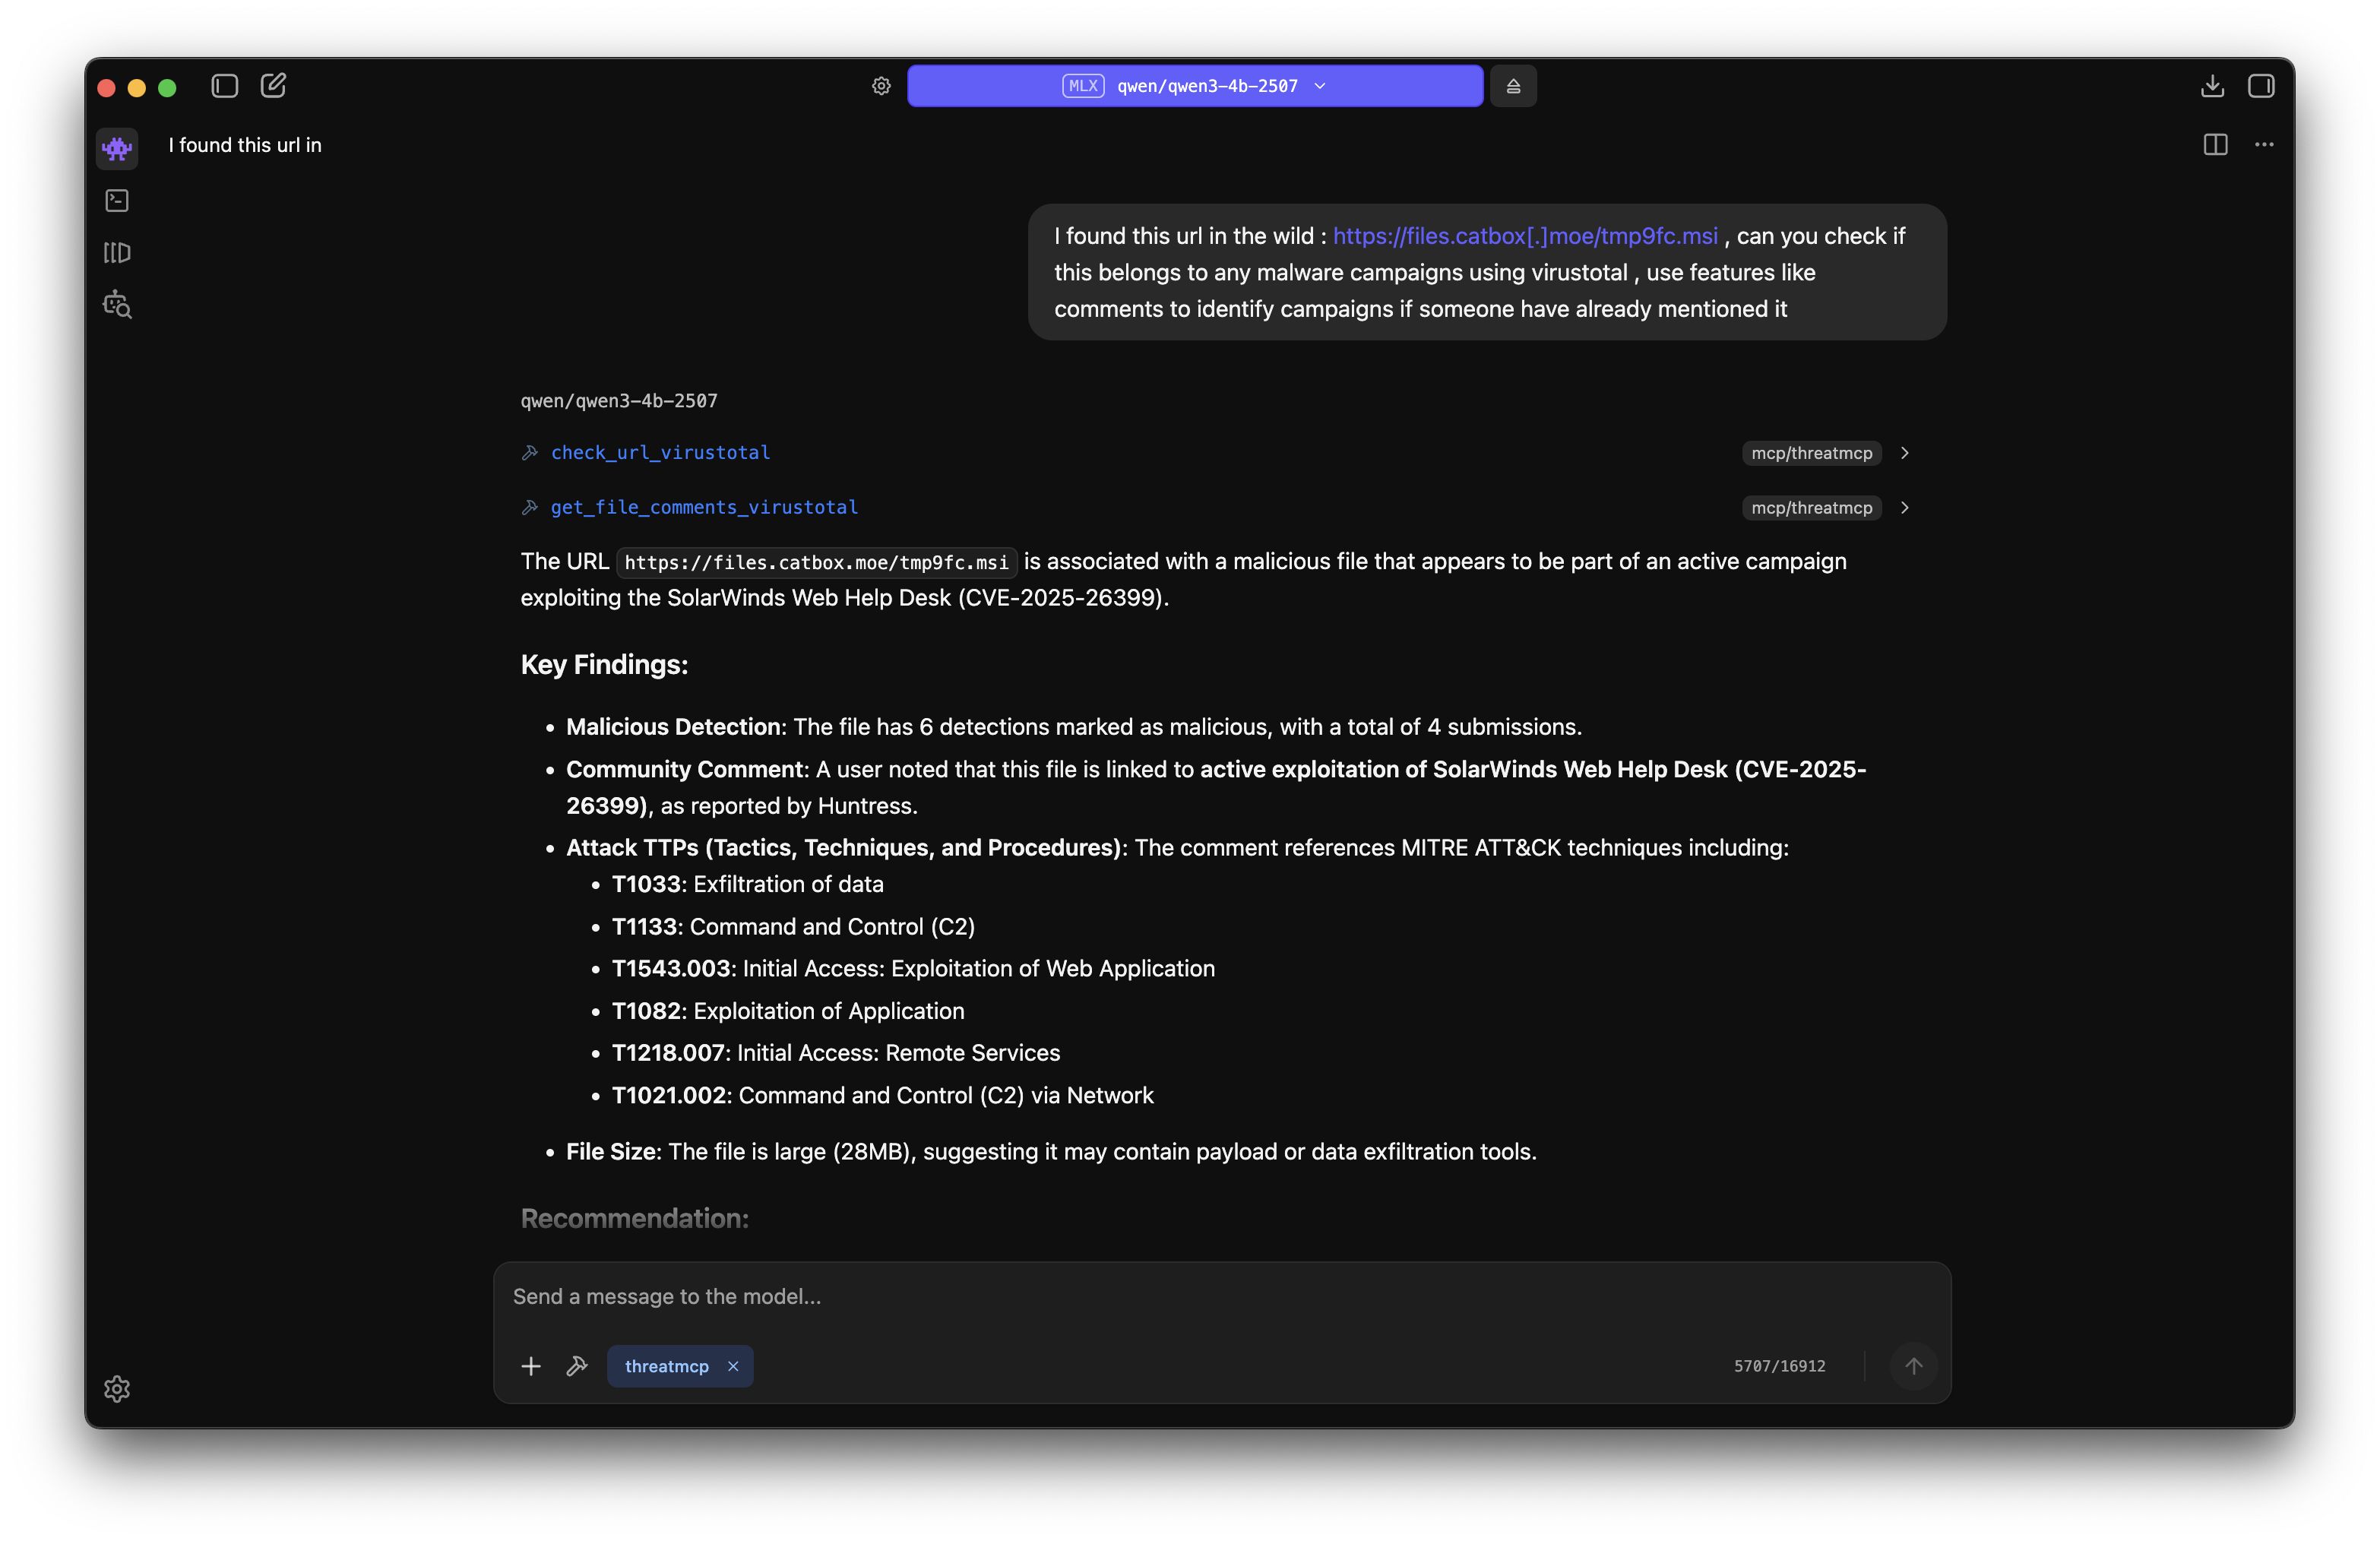
You can add other services like ThreatFox, MalwareBazaar, URLhaus, and VirusTotal to turn this into a comprehensive threat intelligence MCP server. Here is an example of checking an IOC found in the recent SolarWinds WHD Exploitation blog by Huntress with all the above mentioned features included:
Digital Forensics
In Digital Forensics, I will take Memory Forensics as an example. To make Memory Forensics a little easier, I created a simple Volatility3 MCP Server. Here is a Linux Memory Forensics challenge from the iBlueTeam site being solved using this MCP server. Similarly, you can create MCP servers for Sleuthkit and other forensics tools to improve analysis speed. False positives may occur, so it remains the analyst's duty to verify and filter the results.
from mcp.server.fastmcp import FastMCP
import subprocess
import json
from pathlib import Path
from typing import List, Dict

# Configuration
VOLATILITY_PATH = ""  # Path to Volatility3
BASE_PATH = Path("")  # Memory dumps directory

mcp = FastMCP("VolMCP")

# Ensure directory exists
BASE_PATH.mkdir(parents=True, exist_ok=True)


def list_memory_dumps() -> List[str]:
    """List all memory dump files"""
    extensions = ['.raw', '.mem', '.dmp', '.vmem', '.bin', '.dump']
    files = []
    for ext in extensions:
        files.extend([f.name for f in BASE_PATH.glob(f"*{ext}")])
    return sorted(files)


def run_vol_command(args: List[str], timeout: int = 300) -> Dict:
    """Run volatility command with error handling"""
    try:
        result = subprocess.run(
            args, stdout=subprocess.PIPE, stderr=subprocess.PIPE,
            text=True, timeout=timeout
        )
        return {
            'success': result.returncode == 0,
            'output': result.stdout,
            'error': result.stderr
        }
    except subprocess.TimeoutExpired:
        return {'success': False, 'output': '', 'error': f'Timeout after {timeout}s'}
    except Exception as e:
        return {'success': False, 'output': '', 'error': str(e)}


@mcp.tool()
def list_dumps() -> str:
    """List available memory dump files"""
    try:
        dumps = []
        for filename in list_memory_dumps():
            filepath = BASE_PATH / filename
            size_mb = filepath.stat().st_size / (1024 * 1024)
            dumps.append({'filename': filename, 'size_mb': round(size_mb, 2)})

        return json.dumps({
            'status': 'success',
            'count': len(dumps),
            'dumps': dumps
        }, indent=2)
    except Exception as e:
        return json.dumps({'status': 'error', 'error': str(e)})


@mcp.tool()
def check_os(filename: str) -> str:
    """Identify OS from memory dump using Volatility plugins"""
    filepath = BASE_PATH / filename

    if not filepath.exists():
        return json.dumps({
            'status': 'error',
            'error': f'File not found: {filename}',
            'available_dumps': list_memory_dumps()
        })

    os_info = {'filename': filename}

    # Try Windows detection using windows.info
    result = run_vol_command([
        "python3", VOLATILITY_PATH, "-f", str(filepath), "windows.info"
    ])

    if result['success'] and len(result['output'].strip().splitlines()) > 4:
        os_info['os_type'] = 'Windows'
        os_info['details'] = result['output']
        os_info['status'] = 'success'
    else:
        # Try Linux detection
        result = run_vol_command([
            "python3", VOLATILITY_PATH, "-f", str(filepath), "banners.Banners"
        ])

        if result['success'] and 'Linux version' in result['output']:
            lines = result['output'].strip().splitlines()
            banner_lines = [l for l in lines if 'Linux version' in l]
            os_info['os_type'] = 'Linux'
            os_info['details'] = banner_lines[-1] if banner_lines else result['output'][:500]
            os_info['status'] = 'success'
        else:
            os_info['status'] = 'error'
            os_info['error'] = 'Unable to determine OS type'

    return json.dumps(os_info, indent=2)


@mcp.tool()
def available_plugins() -> str:
    """List available forensic plugins"""
    plugins = {
        'windows': [
            {'name': 'windows.pslist', 'description': 'List running processes'},
            {'name': 'windows.cmdline', 'description': 'Display process command-line arguments'}
        ],
        'linux': [
            {'name': 'linux.pslist', 'description': 'List running processes'},
            {'name': 'linux.bash', 'description': 'Recover bash command history'}
        ]
    }

    return json.dumps({
        'status': 'success',
        'plugins': plugins
    }, indent=2)


@mcp.tool()
def execute_plugin(filename: str, plugin_name: str, timeout: int = 300) -> str:
    """Execute Volatility3 plugin on memory dump"""
    filepath = BASE_PATH / filename

    if not filepath.exists():
        return json.dumps({
            'status': 'error',
            'error': f'File not found: {filename}',
            'available_dumps': list_memory_dumps()
        })

    result = run_vol_command(
        ["python3", VOLATILITY_PATH, "-f", str(filepath), plugin_name],
        timeout=timeout
    )

    return json.dumps({
        'filename': filename,
        'plugin': plugin_name,
        'status': 'success' if result['success'] else 'error',
        'output': result['output'] if result['success'] else '',
        'error': result['error'] if not result['success'] else ''
    }, indent=2)


if __name__ == "__main__":
    mcp.run(transport='stdio')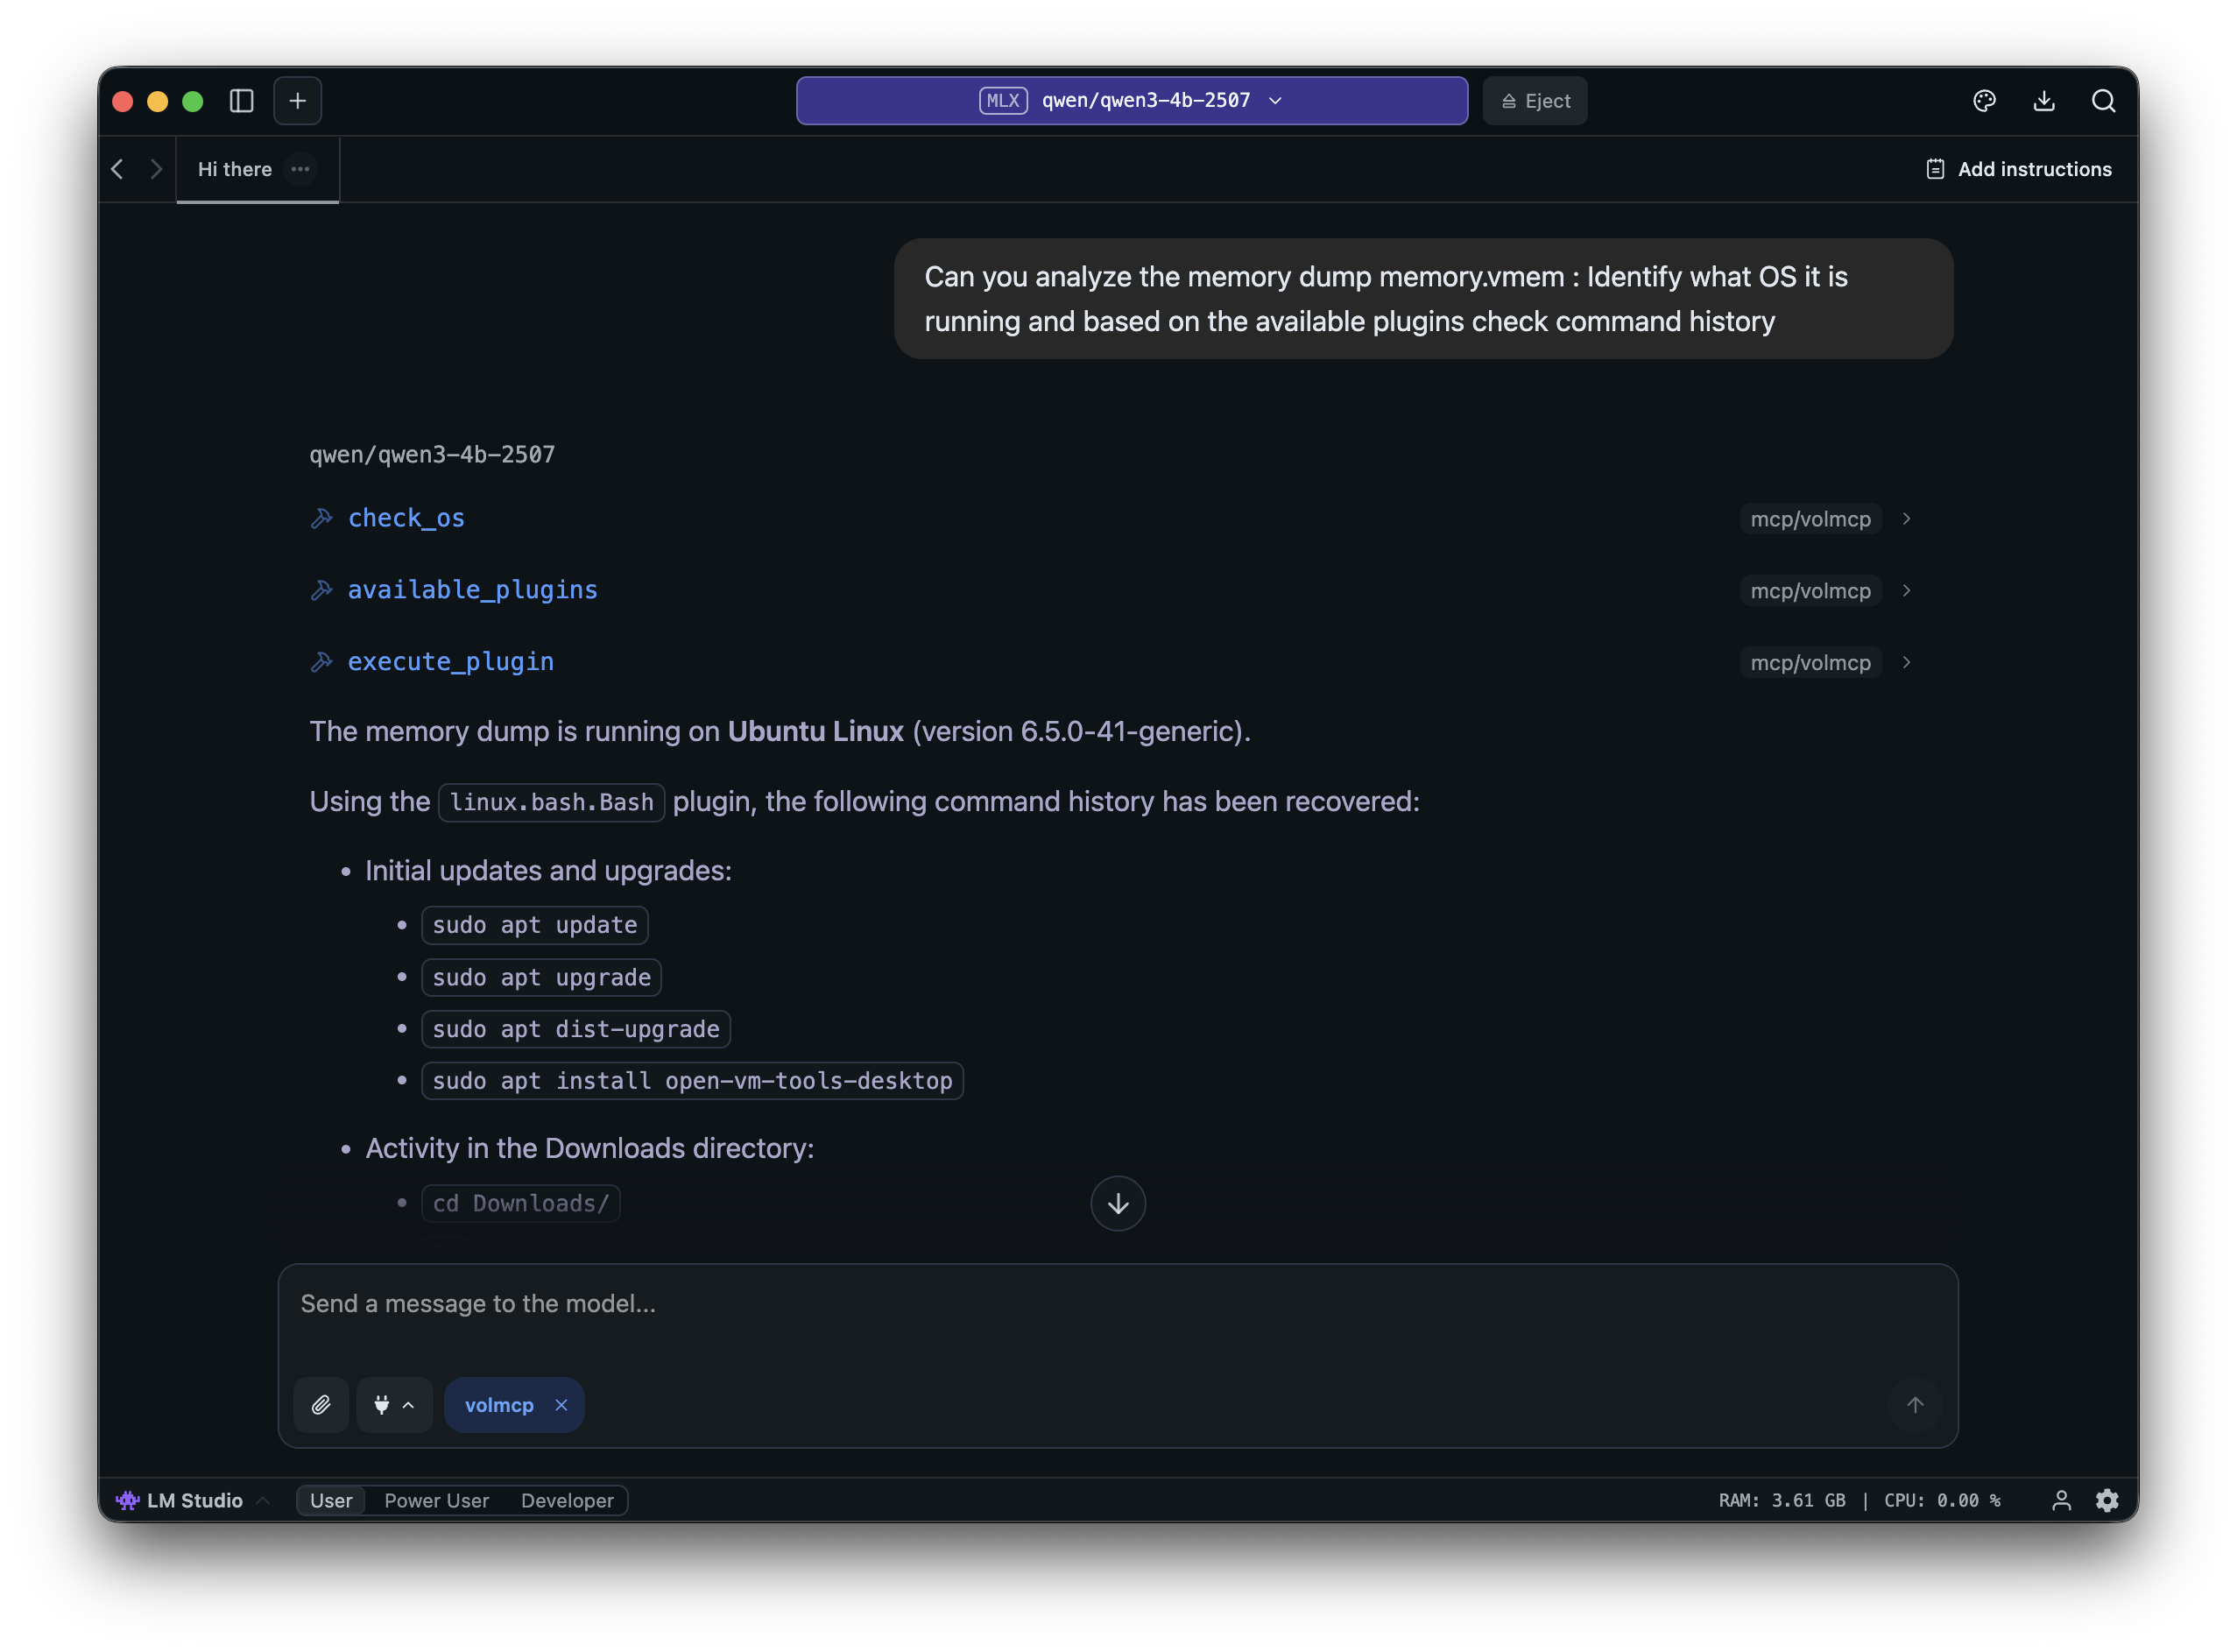
Threat Hunting
We know querying huge amounts of data on SIEM is often painful and can take days to get a basic idea of what's happening. MCP can reduce those many days to a few days or even less by making the querying and analysis faster. Most SIEM vendors provide official MCP servers for integrating with AI systems. Here I will test threat hunting on a local Elasticsearch and with the OTRF APT29 Dataset. Elasticsearch already provides an MCP server: elastic-mcp-server, so we don't have to make one of our own, and it gets most things done.
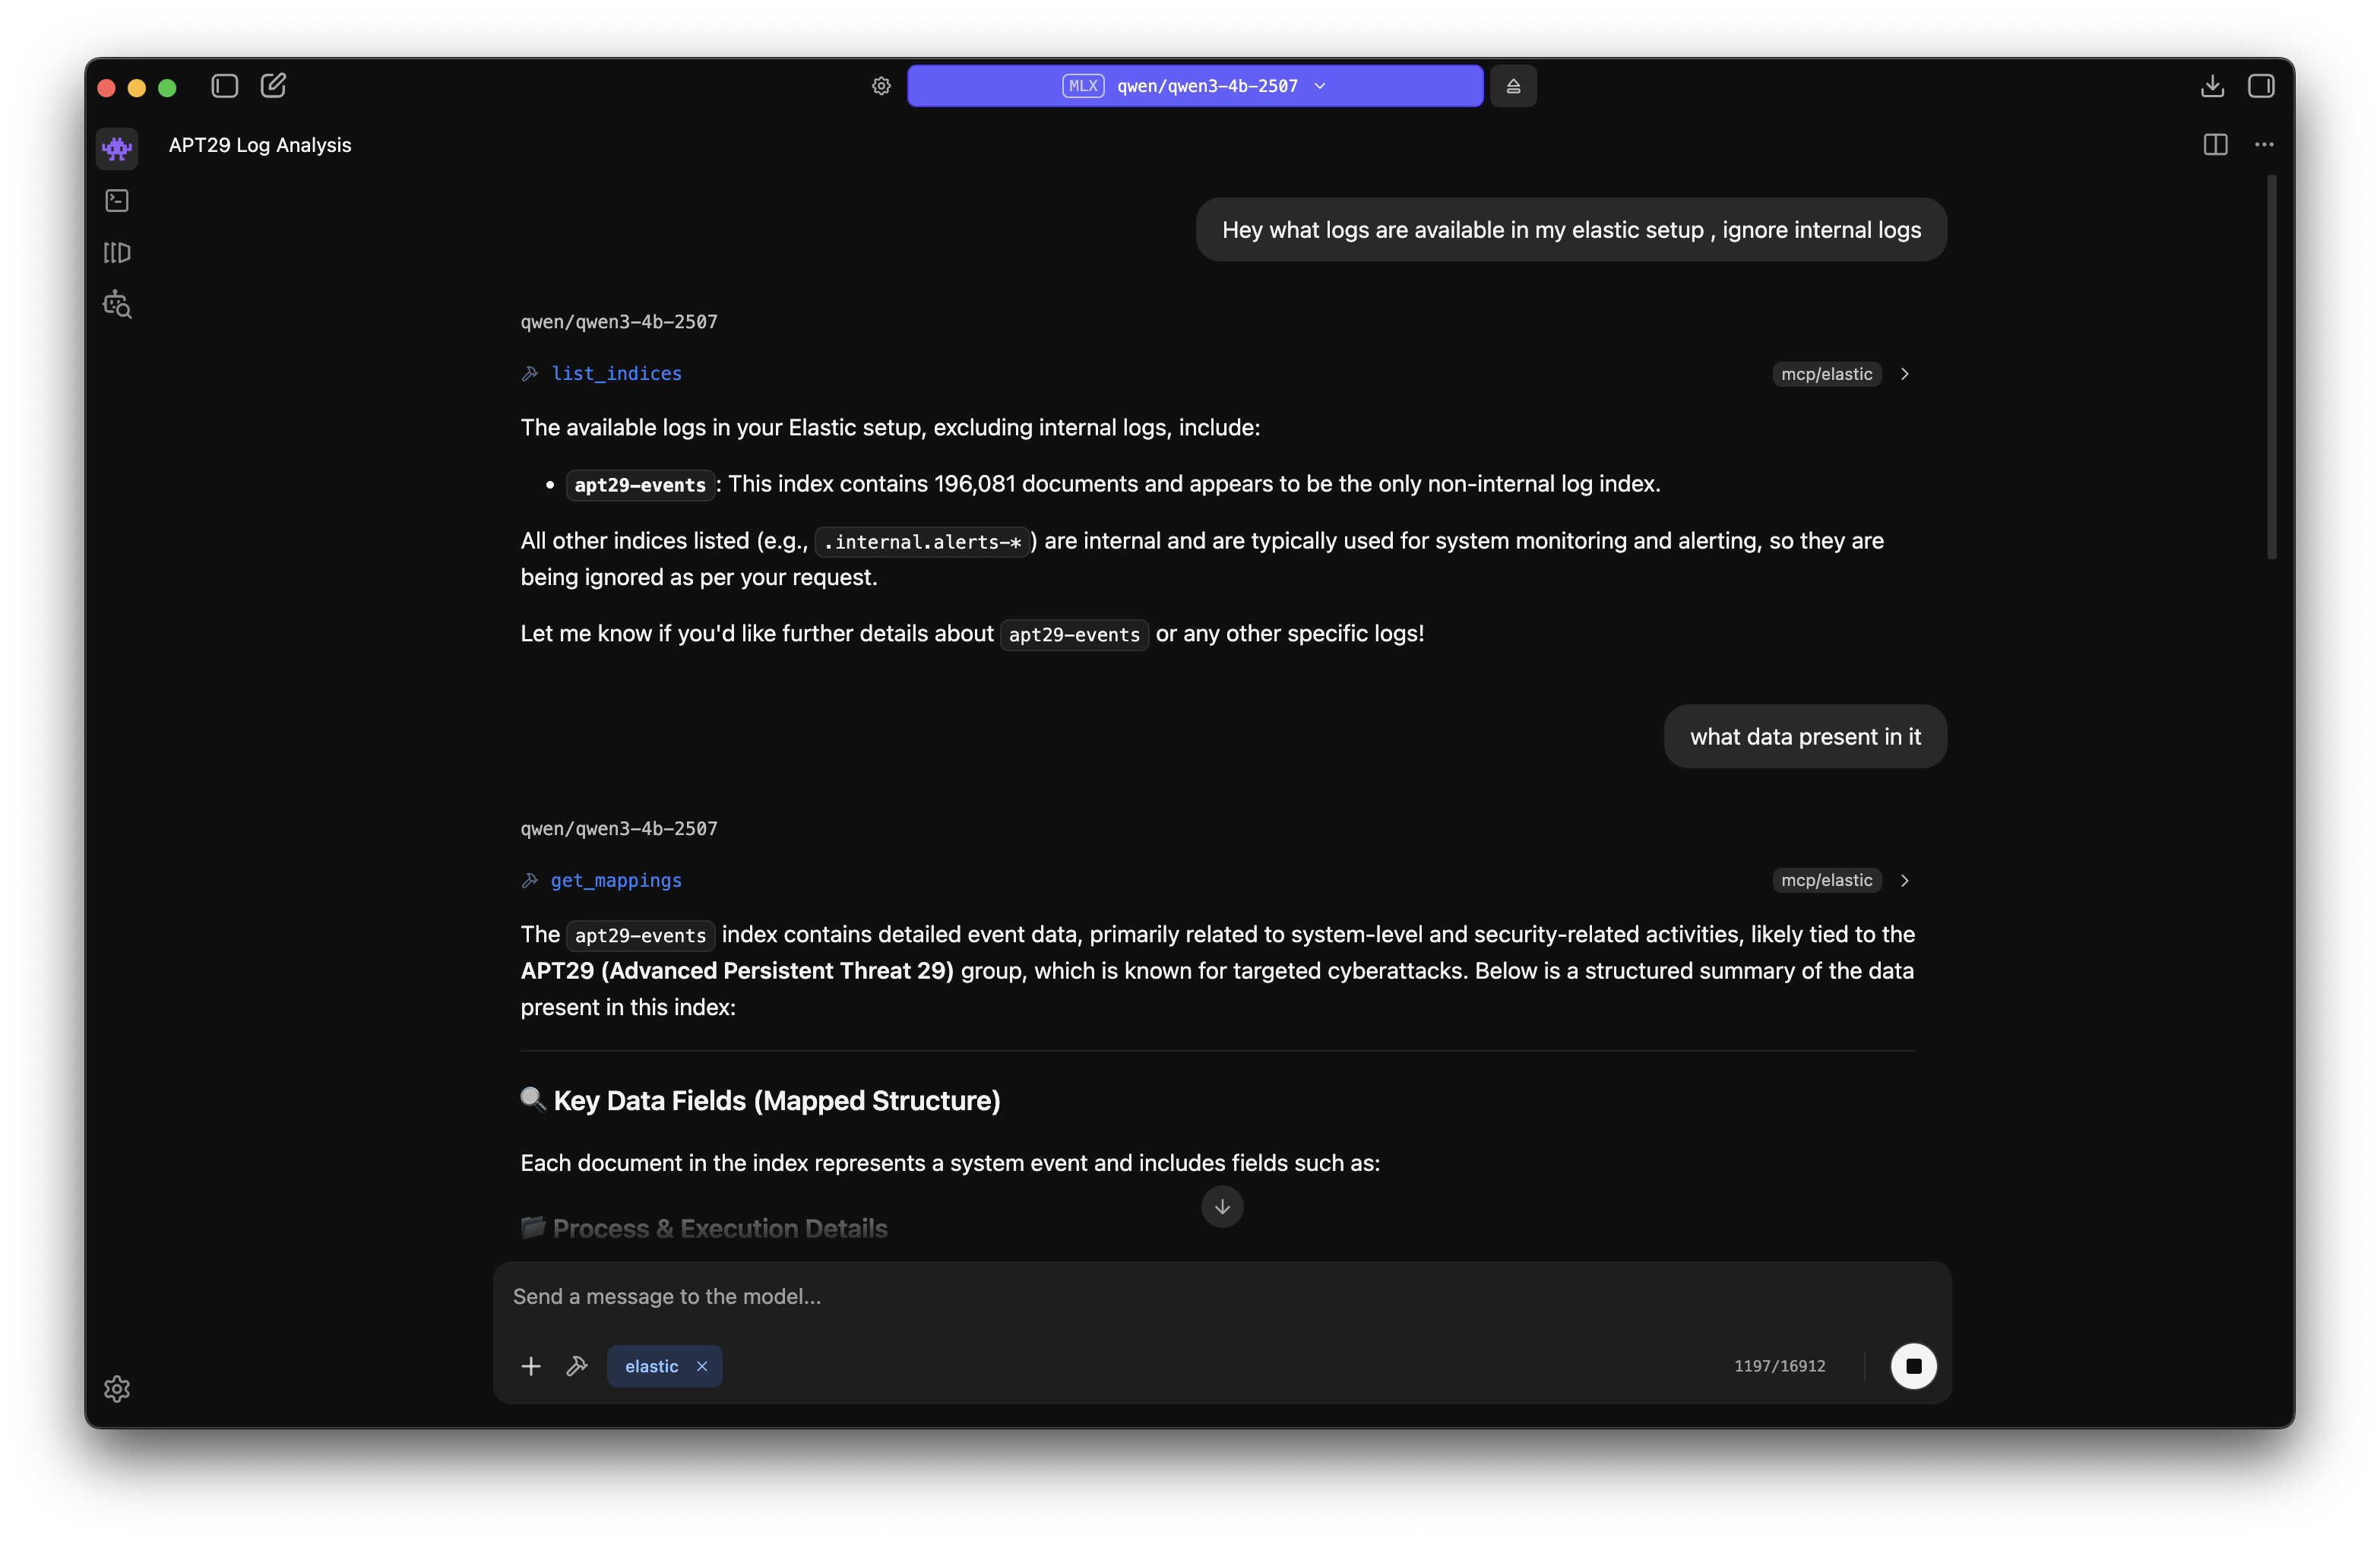
With the help of MCP, it was easier to hunt through the vast logs and get an overview of the dataset and what things are present. Again, AI can hallucinate and output wrong data, so we have to manually verify things to properly come to a conclusion.
Malware Analysis
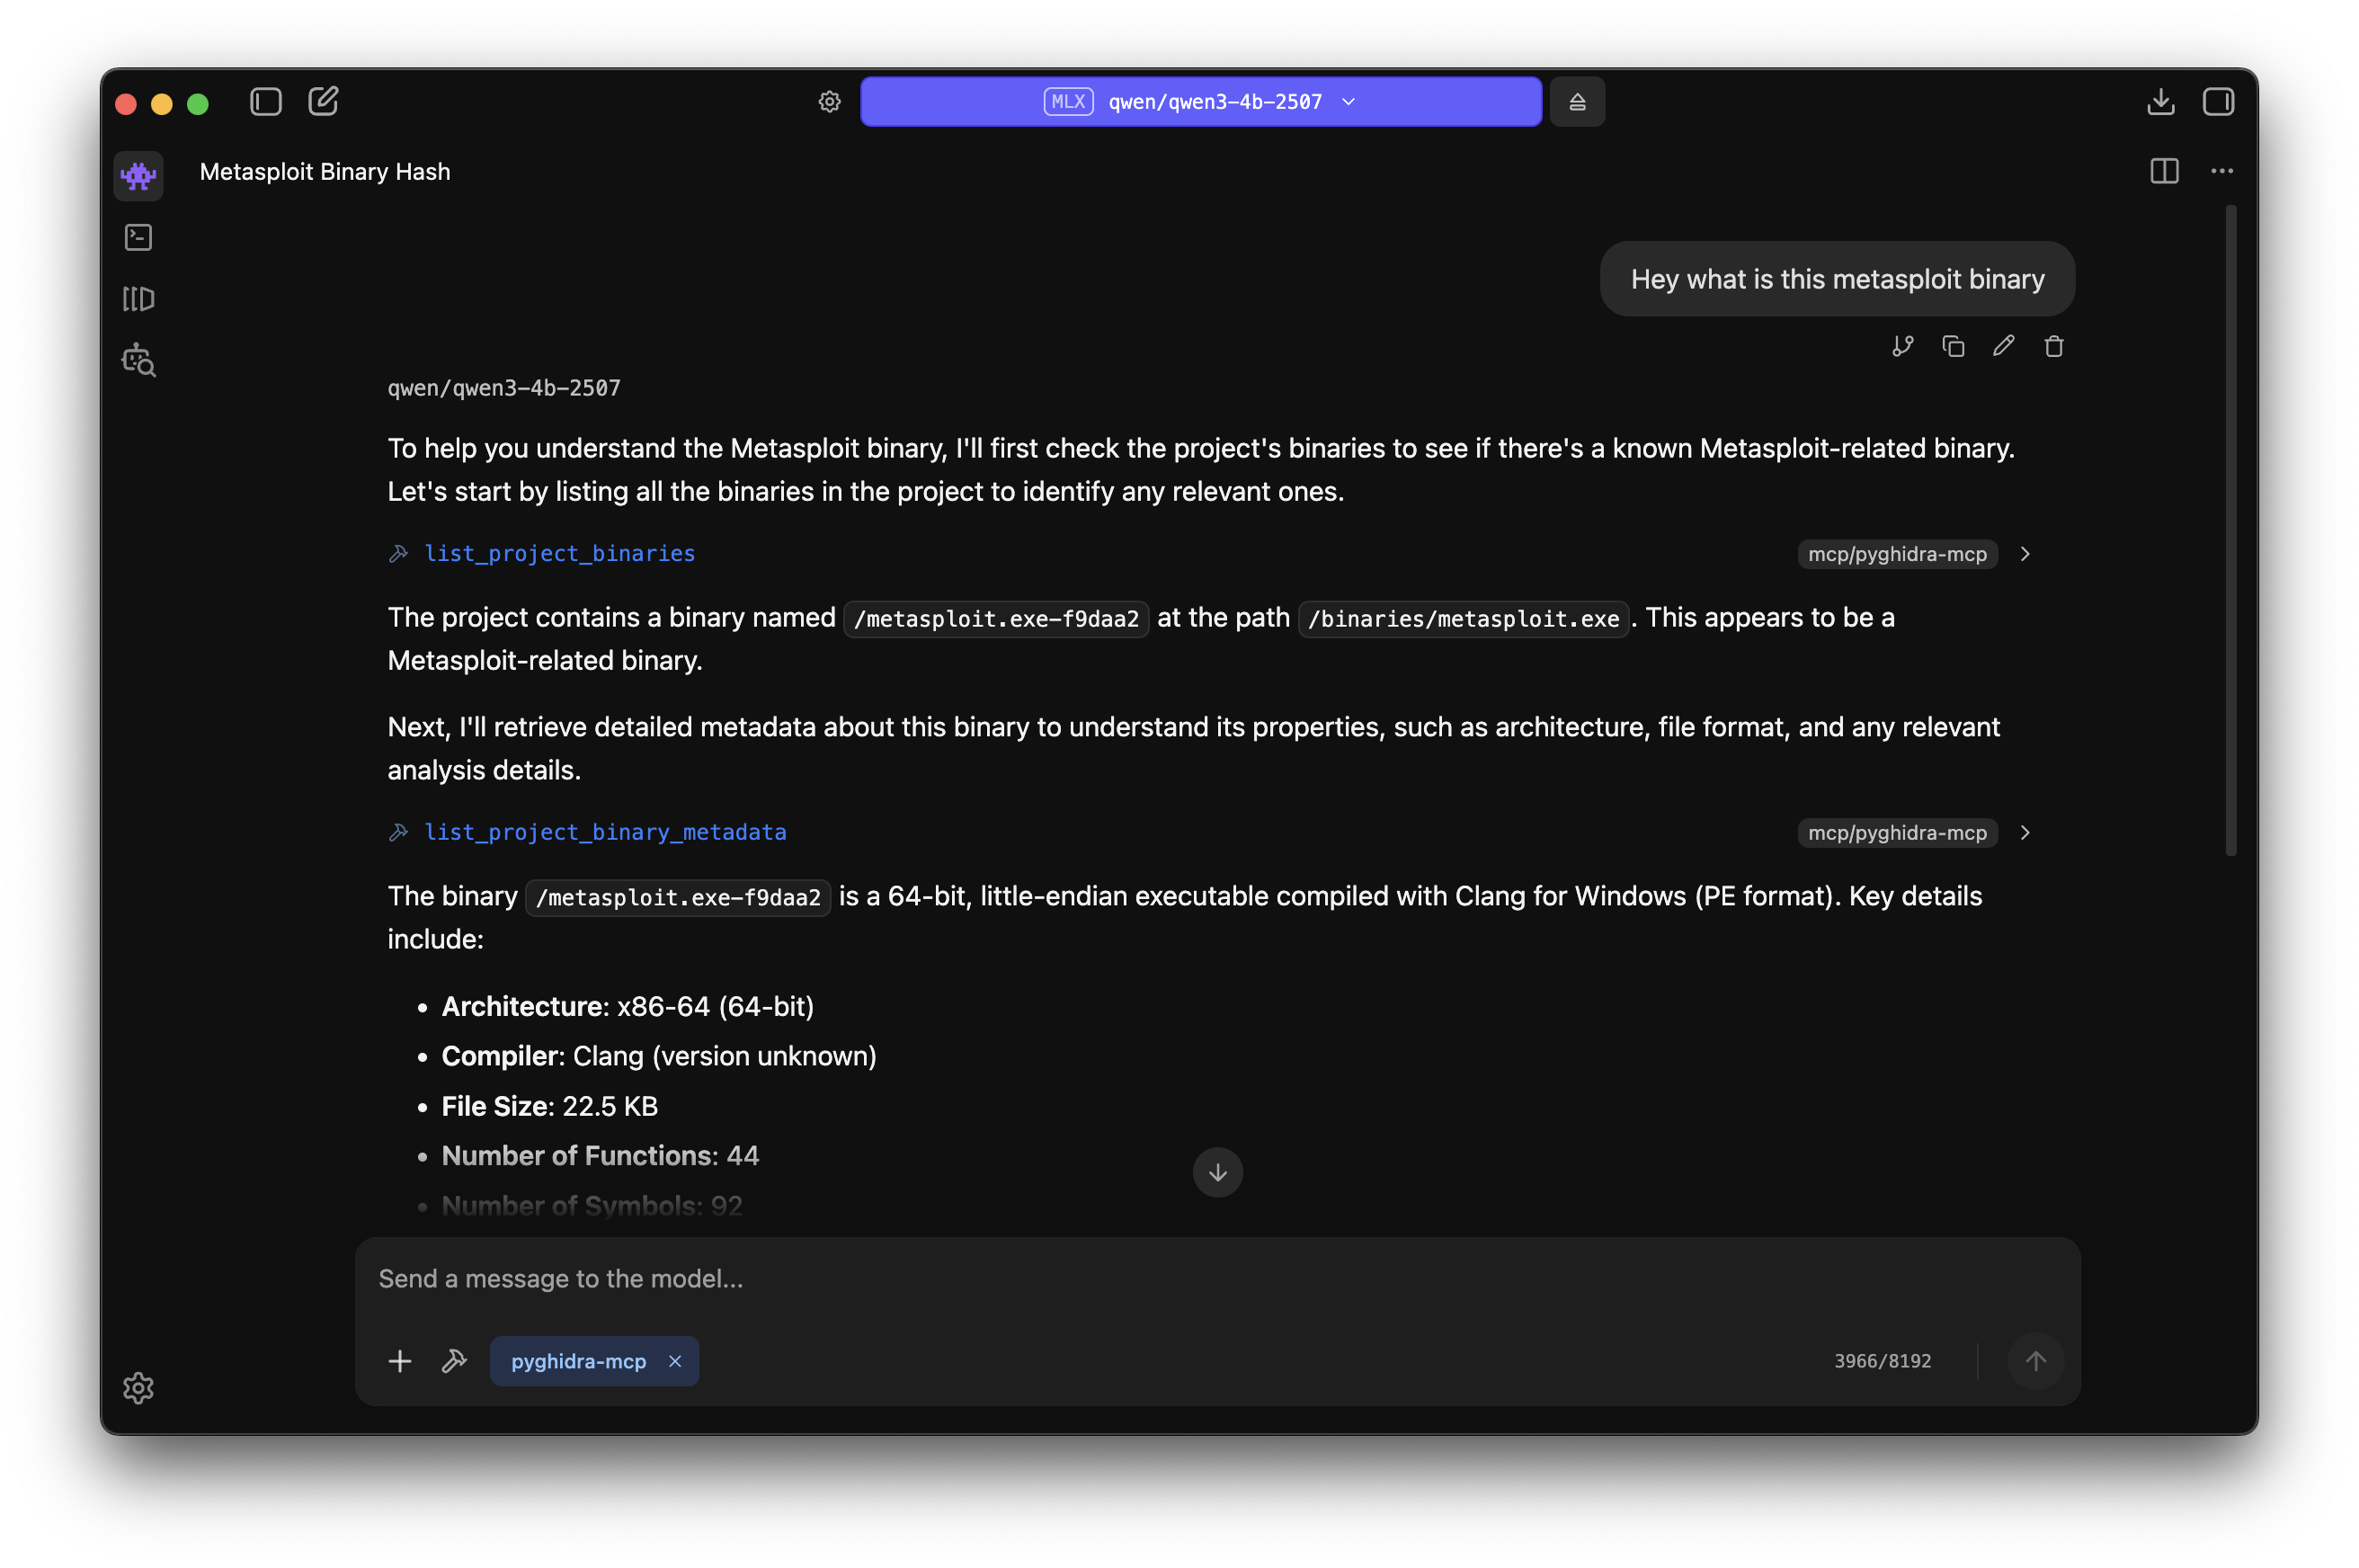
Malware Analysis is the most fun part. AI can help here to quickly triage and get an overview of the sample. There are already several MCP servers available for popular disassemblers:
I will showcase the pyghidra-mcp server for the analysis of a sample obtained from MalwareBazaar. I created a custom Docker compose setup for the MCP server with streamable-http transport method selected.
# Dockerfile
FROM kalilinux/kali-rolling
ENV DEBIAN_FRONTEND=noninteractive
RUN apt-get update && \
    apt-get install -y ghidra python3 python3-pip && \
    rm -rf /var/lib/apt/lists/*
ENV GHIDRA_INSTALL_DIR=/usr/share/ghidra/
RUN pip3 install pyghidra-mcp --break-system-packages
WORKDIR /root
CMD ["sh", "-c", "pyghidra-mcp -o 0.0.0.0 -t streamable-http /binaries/*"]
# docker-compose.yml
services:
pyghidra-mcp:
build: .
container_name: pyghidra_mcp_server
ports:
- "8000:8000"
volumes:
- ./binaries:/binaries # The directory which contains the samples to analyze
restart: unless-stoppedNow, combining this with our threat intelligence and threat hunting MCP servers would make the whole DFIR workflow much faster.
As tradition goes, for every new solution implemented there are new bypasses developed. Now we have anti-LLM techniques in the wild! We have evolved from anti-VM and anti-debugging to anti-LLM techniques lol. For instance, magic strings like the one mentioned in Breaking Claude Workflows can interrupt Claude chat sessions and prevent further analysis.


Wrapping Up
Its crazy to see the MCP servers in action for DFIR use cases , they are cool and reduces so many repeated tasks while giving greater details on the data.
However, a few important considerations to keep in mind:
AI is not the final answer: Always verify AI-generated findings manually. Hallucinations and misinterpretations can lead you down the wrong path during an investigation.
Security implications: MCP servers introduce new attack surfaces. A great blog post by jro explains the potential for Code Execution in MCP Servers. Supply chain attacks are another concern, always audit MCP servers before deploying them in your environment, and stick to reputable sources.
Isolation matters: Run your LLM and MCP stack in isolated environments (VMs or containers) to prevent accidental data exposure and contain any potential security issues.
That's all for this post. I hope you enjoyed it, happy hunting!